Canvas Print > Stocktrek Images > Medical
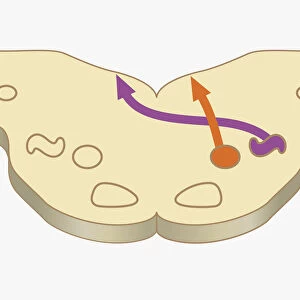
Canvas Print : Pathway of a pain message via sensory nerve in injured muscle


![]()
Canvas Prints from Stocktrek
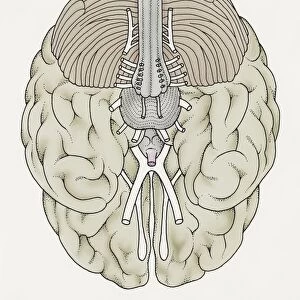
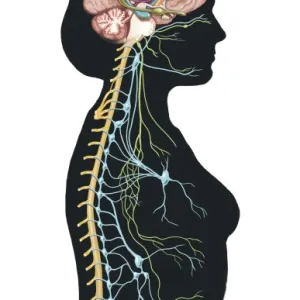
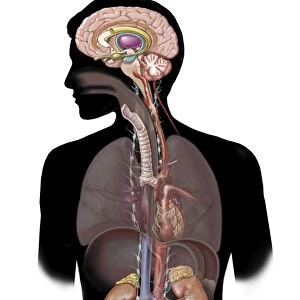
Pathway of a pain message via sensory nerve in injured muscle
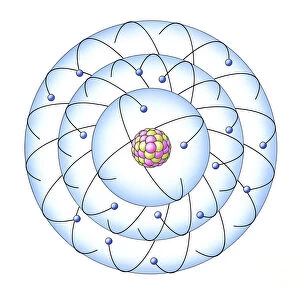
Pathway of a pain message via sensory nerve in injured muscle, to pain gate in spinal cord to limbic system, frontal cortex and sensory cortex in the human brain
Stocktrek Images specializes in Astronomy, Dinosaurs, Medical, Military Forces, Ocean Life, & Sci-Fi
Media ID 13013365
© TriFocal Communications/Stocktrek Images
Anatomy Arrow Sign Biology Biomedical Illustrations Brain Brain Stem Bundle Central Nervous System Cerebellum Cerebral Cortex Cerebrum Communication Cranium Detail Diencephalon Emotion Frontal Lobe Head Healthcare Hippocampus Hormone Human Anatomy Human Body Human Body Parts Human Brain Human Head Human Muscles Human Organs Human Representation Hypothalamus Impulse Inflammation Information Injury Intelligence Medical Medicine Medulla Medulla Oblongata Memory Midbrain Muscle Muscle Fibers Muscle Tissue Nervous System Neuroanatomy Neurology Neurotransmitter Occipital Lobe Pain Parietal Lobe Path Physiology Pineal Gland Pons Profile Releasing Sensory System Signaling Skull Spinal Cord Stimulus Telencephalon Temporal Lobe Thalamus Transmitting Amygdala Cingulate Cortex Cingulate Gyrus Corpus Callosum Fornix Inferior Colliculus Limbic Cortex Limbic System Mesencephalon Pituitary Gland Serotonin Superior Colliculus
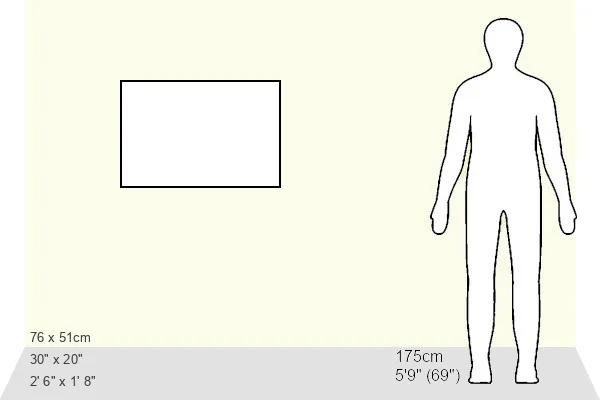
30"x20" (76x51cm) Canvas Print
Explore the intricacies of the human body with our captivating Canvas Prints from Media Storehouse. This particular print showcases the "Pathway of a Pain Message via Sensory Nerve in Injured Muscle" image from TriFocal Communications at Stocktrek Images. Witness in stunning detail the journey of a pain signal as it travels from an injured muscle, up the sensory nerve, through the pain gate in the spinal cord, and on to the limbic system, frontal cortex, and sensory cortex in the brain. Our high-quality canvas prints bring the beauty and complexity of scientific imagery into your home or office, making for a thought-provoking and engaging conversation piece.
Delivered stretched and ready to hang our premium quality canvas prints are made from a polyester/cotton blend canvas and stretched over a 1.25" (32mm) kiln dried knot free wood stretcher bar. Packaged in a plastic bag and secured to a cardboard insert for safe transit.
Canvas Prints add colour, depth and texture to any space. Professionally Stretched Canvas over a hidden Wooden Box Frame and Ready to Hang
Estimated Product Size is 76.2cm x 50.8cm (30" x 20")
These are individually made so all sizes are approximate
Artwork printed orientated as per the preview above, with landscape (horizontal) orientation to match the source image.
EDITORS COMMENTS
This artwork titled "Pathway of a Pain Message via Sensory Nerve in Injured Muscle" takes us on a mesmerizing journey through the intricate workings of the human brain and nervous system. Against a pristine white background, this digitally generated image showcases the complexity and beauty of our neural pathways. The illustration begins with an injured muscle, where pain signals are initiated. These messages then travel along sensory nerves, making their way to the spinal cord's pain gate. From there, they continue their transmission towards various regions within the brain responsible for processing emotions, memories, and sensations. As we delve deeper into this visual representation of neuroanatomy, we encounter key structures such as the amygdala, hippocampus, cerebral cortex, and thalamus. The vibrant colors used in this artwork bring life to these vital components that contribute to our perception of pain. Through its meticulous attention to detail and scientific accuracy, TriFocal Communications' print offers viewers a glimpse into how our bodies communicate information about stimuli like pain. This piece serves as a reminder of both the intricacy and resilience of our biological systems while highlighting the crucial role healthcare professionals play in understanding and treating conditions related to pain. With its blend of artistry and medical knowledge, this illustration is not only visually striking but also educational—a testament to Stocktrek Images' commitment to providing high-quality biomedical illustrations that bridge science with aesthetics.
MADE IN THE USA
Safe Shipping with 30 Day Money Back Guarantee
FREE PERSONALISATION*
We are proud to offer a range of customisation features including Personalised Captions, Color Filters and Picture Zoom Tools
SECURE PAYMENTS
We happily accept a wide range of payment options so you can pay for the things you need in the way that is most convenient for you
* Options may vary by product and licensing agreement. Zoomed Pictures can be adjusted in the Cart.