Fine Art Print > Animals > Mammals > Muridae > Western Mouse
Fine Art Print : Signalling equipment on the Western Front, WW1

![]()
Fine Art Prints From Mary Evans Picture Library
Signalling equipment on the Western Front, WW1
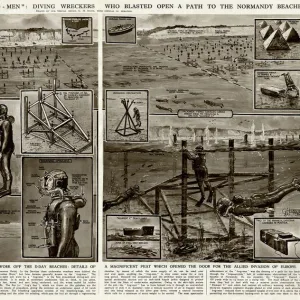
The various instruments used by signallers in transmitting messages on the Western Front during the First World War. In the left hand top corner are the aerial cables conveying telephone or Morse code messages. The lines are laid on the ground or buried near the firing line. Next is the Begbie lamp for flashing Morse code messages. Then two kinds of flags - one white and another blue - for use against light or dark backgrounds. An electric lamp on a tripod stand is used at night. Two types of flap or disc instruments follow. They are opened and shut with the long and short pauses of the Morse code. The one with the three flaps attached to a spring can be attached to a tree or wall. Then comes the much more familiar heliograph with its mirrors, which, of course, require sunshine to transmit messages. Finally, there is a whistle, which can be used for signals with Morse or other code. Date: 1918
Mary Evans Picture Library makes available wonderful images created for people to enjoy over the centuries
Media ID 14168769
© Illustrated London News Ltd/Mary Evans
Cables Code Communication Flashing Instruments Lamp Messages Morse Signal Signallers Signalling Telephone Transmitting
21"x14" (+3" Border) Fine Art Print
Step back in time with our exclusive Fine Art Print from Media Storehouse, featuring the captivating image of Signalling Equipment on the Western Front during World War 1. This evocative print, sourced from Mary Evans Prints Online, transports you to the heart of the battlefield as signallers worked tirelessly to transmit messages through aerial cables, connecting the front lines with their commanders. A must-have for history enthusiasts and art collectors alike, this print adds depth and character to any space, showcasing the intricate details of the various instruments used during this pivotal period in history.
21x14 image printed on 27x20 Fine Art Rag Paper with 3" (76mm) white border. Our Fine Art Prints are printed on 300gsm 100% acid free, PH neutral paper with archival properties. This printing method is used by museums and art collections to exhibit photographs and art reproductions.
Our fine art prints are high-quality prints made using a paper called Photo Rag. This 100% cotton rag fibre paper is known for its exceptional image sharpness, rich colors, and high level of detail, making it a popular choice for professional photographers and artists. Photo rag paper is our clear recommendation for a fine art paper print. If you can afford to spend more on a higher quality paper, then Photo Rag is our clear recommendation for a fine art paper print.
Estimated Image Size (if not cropped) is 53.3cm x 35.5cm (21" x 14")
Estimated Product Size is 68.6cm x 50.8cm (27" x 20")
These are individually made so all sizes are approximate
Artwork printed orientated as per the preview above, with landscape (horizontal) orientation to match the source image.
FEATURES IN THESE COLLECTIONS
> Aerial Photography
> Related Images
> Animals
> Birds
> Passerines
> Whistlers
> Related Images
> Animals
> Mammals
> Muridae
> Western Mouse
> Historic
> World War I and II
> Military equipment
EDITORS COMMENTS
This evocative photograph captures the essential tools of communication used by signallers on the Western Front during the First World War. In the upper left corner, aerial cables are laid on the ground and buried near the firing line, conveying telephone or Morse code messages. Above these, a Begbie lamp flashes Morse code messages in the dark, its bright light piercing the night. Two kinds of flags are displayed, one white for use against light backgrounds and another blue for darker conditions. An electric lamp on a tripod stand illuminates the area for night-time signalling. Two types of flap or disc instruments follow, opened and shut with the long and short pauses of Morse code. The one with the three flaps attached to a spring can be easily attached to a tree or wall. The more familiar heliograph, with its mirrors, requires sunshine to transmit messages. Lastly, a whistle is shown, which can be used for signals with Morse or other codes. This powerful image, dated 1918, offers a glimpse into the complex communication systems that played a vital role in the conduct of the First World War.
MADE IN THE USA
Safe Shipping with 30 Day Money Back Guarantee
FREE PERSONALISATION*
We are proud to offer a range of customisation features including Personalised Captions, Color Filters and Picture Zoom Tools
FREE COLORIZATION SERVICE
You can choose advanced AI Colorization for this picture at no extra charge!
SECURE PAYMENTS
We happily accept a wide range of payment options so you can pay for the things you need in the way that is most convenient for you
* Options may vary by product and licensing agreement. Zoomed Pictures can be adjusted in the Basket.