Home > Historic > Battles > Battle of Britain > Bombing raids during the Battle of
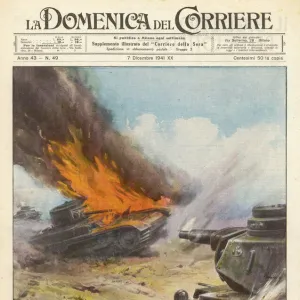
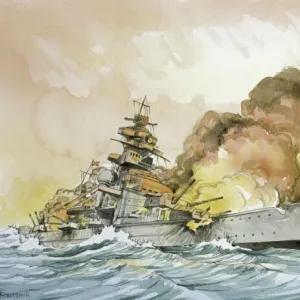
The fight around Tobruk (colour litho)
")
![]()
Wall Art and Photo Gifts from Fine Art Finder
The fight around Tobruk (colour litho)
2778559 The fight around Tobruk (colour litho) by Beltrame, Achille (1871-1945); Private Collection; (add.info.: The fight around Tobruk. The British and Australians, besieged by Tobruk, try desperately but in vain to get out of the grip that holds them. During an enemy attack, six tanks that had gone as far as our batteries are immobilized and our gunners with hand grenades reduce the enemy tankers to impotence. Illustration for Courier Sunday, 11 May 1941.); © Look and Learn
Media ID 23456514
© Look and Learn / Bridgeman Images
39 45 Across Australia Alied Alliance Allies Ally Arid Army And Navy Artillery Artilleryman Artillerymen Attacked Attacker Australians Axis Battles Bomb Bombs Defence Gun Desert Desert Scene Deserts Dsert Exploded Exploding Explosion Explosions Explosive Firearm Gun Barrel Gunpoint Hand Guns Hunting Rifle Ii World War Libya Libyan Libyans Naval Artillery North East Africa North West Africa Northafrica Ring Second World War South Australia Tobruk War 1939 1945 West Australian World War World War 2 World War Ii World War Two Wwii Achille Beltrame Afica Afric Beltrame Achille 1871 1945 Brawl Brawling Central Africa Combat Troops Conscripts Defensive Weapon Female Soldiers Fighting Conflict Infantry Weapon Navy Soldier Navy Soldiers News Item Soldier Troop War Scene War Zone
FEATURES IN THESE COLLECTIONS
> Africa
> Libya
> Related Images
> Africa
> South Africa
> Related Images
> Animals
> Mammals
> Muridae
> Desert Mouse
> Europe
> France
> Canton
> Allier
> Fine Art Finder
> Artists
> Achille Beltrame
> Fine Art Finder
> Artists
> French School
> Historic
> Battles
> Battle of Britain
> Bombing raids during the Battle of
> Historic
> Battles
> Battle of Britain
> Bombings
> Historic
> World War I and II
> Naval warfare
> Historic
> World War I and II
> Soldiers
The Fight Around Tobruk - A Desperate Struggle for Freedom
EDITORS COMMENTS
. In this print by Achille Beltrame, we are transported back to the intense battlegrounds of Tobruk during World War II. The image vividly captures the chaos and bravery that defined this historic conflict. The British and Australian forces find themselves besieged within Tobruk, desperately attempting to break free from the grip of their enemies. As enemy tanks advance towards them, six immobilized tanks become a symbol of defiance against overwhelming odds. With unwavering determination, our gunners unleash a hailstorm of hand grenades upon the enemy tankers, rendering them impotent in their attack. Amidst billowing smoke and exploding bombs, soldiers from different nations stand united against a common foe. Australians fight alongside Africans and Libyans as part of an allied force determined to defend their position at all costs. The deafening sound of artillery echoes through the desert as brave men engage in fierce combat. Beltrame's illustration originally appeared in Courier Sunday on May 11th, 1941 – capturing not only a moment in history but also serving as a testament to human resilience and courage amidst adversity. This powerful image serves as a reminder of the sacrifices made by those who fought for freedom during World War II. It stands as an enduring tribute to the indomitable spirit displayed by soldiers from around the world who stood together against tyranny.
MADE IN THE USA
Safe Shipping with 30 Day Money Back Guarantee
FREE PERSONALISATION*
We are proud to offer a range of customisation features including Personalised Captions, Color Filters and Picture Zoom Tools
SECURE PAYMENTS
We happily accept a wide range of payment options so you can pay for the things you need in the way that is most convenient for you
* Options may vary by product and licensing agreement. Zoomed Pictures can be adjusted in the Cart.