Photographic Print > Africa > South Africa > Maps
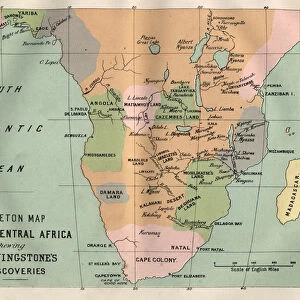
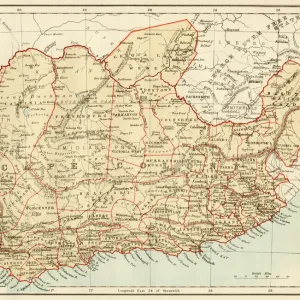
Photographic Print : Lord Kitcheners Blockhouse System In South Africa. The Ramifications Of The Blockhouse System, Which Played So Large A Part In The Concluding Operations In South Africa, After The Second Boer War, Are Shown Here By Black Circles And Lines, Which Represent Respectively The Blockhouses And The Barbed Wire Entanglements Connecting Them. Actually, The Blockhouses Were About 600 Yards Apart; That Is, About Three To Every Mile. It Will Be Seen That All The Railways Were Protected By A Line Of Little Forts Along One Side Of The Rails, And That Pretoria And Johannesburg Were Surrounded By A Network Of Blockhouse Cordons. The Other Lines Sometimes Followed Roadways, As From Bloemfontein To Ladybrand, Or They Cut Across The Open In Order To Close Districts Used By The Boer Bands, Such As The Lindley-Bethlehem Country. From Pretoria The Blockhouses Extended Eastwards To Komati Poort, Which Is Beyond The Range Of The Map. From Field Marshal Lord Kitchener, His Life And Work For The Empire, Published 1916

![]()
Photo Prints From Design Pics
Lord Kitcheners Blockhouse System In South Africa. The Ramifications Of The Blockhouse System, Which Played So Large A Part In The Concluding Operations In South Africa, After The Second Boer War, Are Shown Here By Black Circles And Lines, Which Represent Respectively The Blockhouses And The Barbed Wire Entanglements Connecting Them. Actually, The Blockhouses Were About 600 Yards Apart; That Is, About Three To Every Mile. It Will Be Seen That All The Railways Were Protected By A Line Of Little Forts Along One Side Of The Rails, And That Pretoria And Johannesburg Were Surrounded By A Network Of Blockhouse Cordons. The Other Lines Sometimes Followed Roadways, As From Bloemfontein To Ladybrand, Or They Cut Across The Open In Order To Close Districts Used By The Boer Bands, Such As The Lindley-Bethlehem Country. From Pretoria The Blockhouses Extended Eastwards To Komati Poort, Which Is Beyond The Range Of The Map. From Field Marshal Lord Kitchener, His Life And Work For The Empire, Published 1916
Design Pics offers Distinctively Different Imagery representing over 1,500 contributors
Media ID 18199660
© Ken Welsh / Design Pics
1st Earl Kitchener Africa African Anglo Anglo Boer Boer Herbert Horatio Horatio Herbert Kitchener Kitchener Lord Marshal Second South System Blockhouse
10"x8" Photo Print
Step back in time with this captivating photograph of Lord Kitchener's Blockhouse System in South Africa, taken from the historical archives by Ken Welsh. This image provides a glimpse into the aftermath of the Second Boer War, showcasing the extensive network of blockhouses and barbed wire entanglements that once protected railways and major cities like Pretoria and Johannesburg. With black circles representing the blockhouses and connecting lines depicting the barbed wire, this photograph offers a unique perspective on the strategic military layout that shaped South Africa's history. Extending beyond the map's range to Komati Poort, these fortifications were crucial in securing key areas and preventing Boer attacks. Experience a piece of history with this striking and informative photograph.
Photo prints are produced on Kodak professional photo paper resulting in timeless and breath-taking prints which are also ideal for framing. The colors produced are rich and vivid, with accurate blacks and pristine whites, resulting in prints that are truly timeless and magnificent. Whether you're looking to display your prints in your home, office, or gallery, our range of photographic prints are sure to impress. Dimensions refers to the size of the paper in inches.
Our Photo Prints are in a large range of sizes and are printed on Archival Quality Paper for excellent colour reproduction and longevity. They are ideal for framing (our Framed Prints use these) at a reasonable cost. Alternatives include cheaper Poster Prints and higher quality Fine Art Paper, the choice of which is largely dependant on your budget.
Estimated Product Size is 20.3cm x 25.4cm (8" x 10")
These are individually made so all sizes are approximate
Artwork printed orientated as per the preview above, with portrait (vertical) orientation to match the source image.
FEATURES IN THESE COLLECTIONS
> Africa
> South Africa
> Johannesburg
> Africa
> South Africa
> Maps
> Africa
> South Africa
> Pretoria
> Africa
> South Africa
> Related Images
> Maps and Charts
> British Empire Maps
> Popular Themes
> Railway Posters
EDITORS COMMENTS
This print showcases Lord Kitchener's Blockhouse System in South Africa, which played a significant role in the concluding operations after the Second Boer War. The image depicts black circles and lines representing the blockhouses and barbed wire entanglements that connected them. Interestingly, these blockhouses were strategically placed approximately 600 yards apart, equating to roughly three per mile. The photograph reveals how all railways were safeguarded by a line of small forts positioned alongside the rails. Moreover, Pretoria and Johannesburg were encircled by an intricate network of blockhouse cordons. In some instances, these fortifications followed roadways like the route from Bloemfontein to Ladybrand. Alternatively, they cut across open areas to close off districts utilized by Boer bands such as the Lindley-Bethlehem country. It is worth noting that this particular map only displays part of Lord Kitchener's Blockhouse System as it extends eastwards beyond Komati Poort. Published in 1916 within Field Marshal Lord Kitchener's biography titled "His Life and Work for the Empire" this historical document sheds light on an essential aspect of South African history. Ken Welsh has skillfully captured this momentous piece of history through his photography skills, allowing viewers to appreciate both its strategic significance and architectural beauty.
MADE IN THE USA
Safe Shipping with 30 Day Money Back Guarantee
FREE PERSONALISATION*
We are proud to offer a range of customisation features including Personalised Captions, Color Filters and Picture Zoom Tools
SECURE PAYMENTS
We happily accept a wide range of payment options so you can pay for the things you need in the way that is most convenient for you
* Options may vary by product and licensing agreement. Zoomed Pictures can be adjusted in the Basket.