Metal Print > Oceania > Australia > Hobart
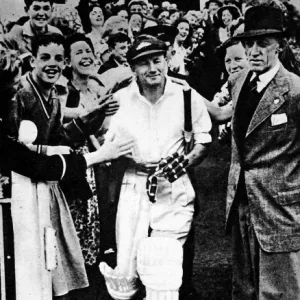
Metal Print : Australia: Panorama showing Part of Hobart Wharves, Tasmania (b / w photo)
")

![]()
Metal Prints From Fine Art Finder
Australia: Panorama showing Part of Hobart Wharves, Tasmania (b / w photo)
7182135 Australia: Panorama showing Part of Hobart Wharves, Tasmania (b/w photo) by Australian Photographer (20th century); Private Collection; (add.info.: Panorama showing Part of Hobart Wharves, Tasmania. Illustration for Glimpses of Australia (Department of External Affairs, Melbourne, 1908).); © Look and Learn
Media ID 24706510
© Look and Learn / Bridgeman Images
Across Australia North Tasmania Panorama Panoramic Panoramic View South Australia Southern Tasmania Tasmania Tasmanian West Australian Australians Photography Art
16"x20" (51x41cm) Metal Print
Bring a piece of Australia's rich history into your home with our Media Storehouse Metal Print of "Panorama showing Part of Hobart Wharves, Tasmania (b/w photo)" by Bridgeman Images from Fine Art Finder. This stunning black and white photograph, taken by an Australian photographer in the 20th century, captures the timeless beauty of Hobart's waterfront. The metal print process enhances the contrast and vibrancy of the image, making it a standout addition to any decor. With its private collection provenance, this print is not only a beautiful work of art but also a piece of Australian history. Order now and bring a piece of Tasmania to your walls.
Made with durable metal and luxurious printing techniques, our metal photo prints go beyond traditional canvases, adding a cool, modern touch to your space. Wall mount on back. Eco-friendly 100% post-consumer recycled ChromaLuxe aluminum surface. The thickness of the print is 0.045". Featuring a Scratch-resistant surface and Rounded corners. Backing hangers are attached to the back of the print and float the print 1/2-inch off the wall when hung, the choice of hanger may vary depending on size and International orders will come with Float Mount hangers only. Finished with a brilliant white high gloss surface for unsurpassed detail and vibrance. Printed using Dye-Sublimation and for best care we recommend a non-ammonia glass cleaner, water, or isopropyl (rubbing) alcohol to prevent harming the print surface. We recommend using a clean, lint-free cloth to wipe off the print. The ultra-hard surface is scratch-resistant, waterproof and weatherproof. Avoid direct sunlight exposure.
Made with durable metal and luxurious printing techniques, metal prints bring images to life and add a modern touch to any space
Estimated Image Size (if not cropped) is 50.8cm x 40.6cm (20" x 16")
Estimated Product Size is 51.4cm x 41.2cm (20.2" x 16.2")
These are individually made so all sizes are approximate
Artwork printed orientated as per the preview above, with landscape (horizontal) orientation to match the source image.
FEATURES IN THESE COLLECTIONS
> Fine Art Finder
> Artists
> Photographer Australian
> Fine Art Finder
> Artists
> Walter (after) Crane
> Oceania
> Australia
> Hobart
> Oceania
> Australia
> Melbourne
> Oceania
> Australia
> Related Images
EDITORS COMMENTS
This photo print, titled "Australia: Panorama showing Part of Hobart Wharves, Tasmania" offers a mesmerizing glimpse into the early 20th century. Taken by an Australian photographer whose identity remains unknown, this image is part of a private collection. The photograph showcases the bustling activity at Hobart Wharves in Tasmania. The panoramic view captures the essence of this vibrant port city with its extensive network of docks and ships. The monochromatic tones add a timeless quality to the scene, emphasizing the historical significance of this era. Published as an illustration for "Glimpses of Australia" in 1908 by the Department of External Affairs in Melbourne, this photo serves as a visual testament to Australia's rich maritime heritage. It transports viewers back to a time when trade and commerce thrived along these shores. The composition masterfully balances both land and sea elements, showcasing Tasmania's unique geography. From southern Tasmania stretching up towards north Tasmania, every corner is represented within this frame. As we gaze upon this remarkable piece from Bridgeman Images' collection, we are reminded not only of our sense of sight but also our sense of history. This photograph encapsulates the spirit and resilience that shaped Australia during its formative years in the early 20th century.
MADE IN THE USA
Safe Shipping with 30 Day Money Back Guarantee
FREE PERSONALISATION*
We are proud to offer a range of customisation features including Personalised Captions, Color Filters and Picture Zoom Tools
SECURE PAYMENTS
We happily accept a wide range of payment options so you can pay for the things you need in the way that is most convenient for you
* Options may vary by product and licensing agreement. Zoomed Pictures can be adjusted in the Basket.