Fraud Blocker Skip to main content

Colenso Collection

"Colenso: A Historical Journey Through Wars and Resilience" Step into the rich history of Colenso

Background imageColenso Collection: Boer War; Colenso

Boer War; Colenso
BATTLE OF COLENSO Buller fails to dislodge the Boers from their positions and has to retire, abandoning ten guns

Background imageColenso Collection: The Zulu war. Residence of Bishop Colenso at Bishopstowe

The Zulu war. Residence of Bishop Colenso at Bishopstowe
Bishop John William Colenso, originally from Cornwall, rocked the establishment by his support for the native Zulus when their lands were threatened by Britain and the Boers

Background imageColenso Collection: Zulu war. St Peters, Bishop Colensos church at Pietermaritz

Zulu war. St Peters, Bishop Colensos church at Pietermaritz
John William Colenso, Bishop of Natal, rocked the establishment with his radical theological views and his support for the Zulu tribes

Background imageColenso Collection: Group photo, Boer War soldiers, with boy bugler

Group photo, Boer War soldiers, with boy bugler
Group photo of Boer War soldiers, including Bugler John Francis Dunne (the boy seated on the ground, right), who saw action at the Battle of Colenso (December 1899) with the Royal Dublin Fusiliers

Background imageColenso Collection: Battle of Colenso memorial

Battle of Colenso memorial
Cairn of stones recalling the battle where 103 soldiers lives were lost of December 15th. The battle of Colenso was the third and final battle fought during the Black Week of the Second Boer War

Background imageColenso Collection: BELTRAME, Achille (1871-1945). Second Boer War

BELTRAME, Achille (1871-1945). Second Boer War. Battle of Colenso, December 15, 1899. Boer forces led by Louis Botha defeated the English army of General Sir Redvers Buller. Engraving

Background imageColenso Collection: Her Majesty the Queen visiting her wounded soldiers (litho)

Her Majesty the Queen visiting her wounded soldiers (litho)
3623434 Her Majesty the Queen visiting her wounded soldiers (litho) by Begg, Samuel (fl.1886-1916) (after); Private Collection; (add.info.: Her Majesty the Queen visiting her wounded soldiers)

Background imageColenso Collection: The Last Shot at Colenso

The Last Shot at Colenso
LAL319217 The Last Shot at Colenso by Woodville, Richard Caton (1825-55); Private Collection; (add.info.: The Last Shot at Colenso. Lieutenant Roberts earns his VC.); © Look and Learn

Background imageColenso Collection: Buller awarding VCs (litho)

Buller awarding VCs (litho)
3623460 Buller awarding VCs (litho) by Finnemore, Joseph (1860-1939) (after); Private Collection; (add.info.: Buller awarding VC s)

Background imageColenso Collection: A Brush with the Enemy before Colenso (engraving)

A Brush with the Enemy before Colenso (engraving)
1599158 A Brush with the Enemy before Colenso (engraving) by Stewart, Frank Algenon (1877-1945); Private Collection; (add.info.: A Brush with the Enemy before Colenso)

Background imageColenso Collection: Our War Portraits (b / w photo)

Our War Portraits (b / w photo)
1599483 Our War Portraits (b/w photo) by English Photographer, (20th century); Private Collection; (add.info.: Our War Portraits. Illustration for The Illustrated London News, 7 April 1900)

Background imageColenso Collection: Frere Bridge, Natal Government Railways, the First to be blown up by the Boers in their Retreat

Frere Bridge, Natal Government Railways, the First to be blown up by the Boers in their Retreat from Estcourt to
1593069 Frere Bridge, Natal Government Railways, the First to be blown up by the Boers in their Retreat from Estcourt to Colenso (b/w photo) by English Photographer

Background imageColenso Collection: The Transvaal War, Some Rivers of Natal, Glimpses of the Garden Colony (litho)

The Transvaal War, Some Rivers of Natal, Glimpses of the Garden Colony (litho)
1592833 The Transvaal War, Some Rivers of Natal, Glimpses of the Garden Colony (litho) by Holland Tringham, Joseph (1861-1908); Private Collection; (add.info.: The Transvaal War)

Background imageColenso Collection: The Transvaal War, Casualties at the Front (engraving)

The Transvaal War, Casualties at the Front (engraving)
1593080 The Transvaal War, Casualties at the Front (engraving) by English School, (19th century); Private Collection; (add.info.: The Transvaal War, Casualties at the Front)

Background imageColenso Collection: The Transvaal War, Casualties at the Front (b / w photo)

The Transvaal War, Casualties at the Front (b / w photo)
1593079 The Transvaal War, Casualties at the Front (b/w photo) by English Photographer, (19th century); Private Collection; (add.info.: The Transvaal War, Casualties at the Front)

Background imageColenso Collection: The War in the Transvaal (engraving)

The War in the Transvaal (engraving)
1599170 The War in the Transvaal (engraving) by Holland Tringham, Joseph (1861-1908); Private Collection; (add.info.: The War in the Transvaal)

Background imageColenso Collection: Sir Redvers Bullers Advance, Colenso, where the Boers are concentrating (b / w photo)

Sir Redvers Bullers Advance, Colenso, where the Boers are concentrating (b / w photo)
1043375 Sir Redvers Bullers Advance, Colenso, where the Boers are concentrating (b/w photo) by English photographer, (19th century) (after); Private Collection; (add.info)

Background imageColenso Collection: Battle of Colenso, 1899 (gravure)

Battle of Colenso, 1899 (gravure)
959904 Battle of Colenso, 1899 (gravure) by Dupray, Henri-Louis (1841-1909); Private Collection; (add.info.: Battle of Colenso, 1899)

Background imageColenso Collection: The Last Shot at Colenso, Lieutenant Roberts earns his VC (colour litho)

The Last Shot at Colenso, Lieutenant Roberts earns his VC (colour litho)
5999430 The Last Shot at Colenso, Lieutenant Roberts earns his VC (colour litho) by Woodville, Richard Caton II (1856-1927) (after); Private Collection; (add.info.: The Last Shot at Colenso)

Background imageColenso Collection: The Transvaal War, Scenes at the Front (b / w photo)

The Transvaal War, Scenes at the Front (b / w photo)
1593012 The Transvaal War, Scenes at the Front (b/w photo) by English Photographer, (19th century); Private Collection; (add.info.: The Transvaal War, Scenes at the Front)

Background imageColenso Collection: With Buller to Ladysmith (litho)

With Buller to Ladysmith (litho)
1599429 With Buller to Ladysmith (litho) by Stewart, Frank Algenon (1877-1945); Private Collection; (add.info.: With Buller to Ladysmith. Illustration for The Illustrated London News, 24 March 1900)

Background imageColenso Collection: The War in the Transvaal (b / w photo)

The War in the Transvaal (b / w photo)
1599316 The War in the Transvaal (b/w photo) by English Photographer, (20th century); Private Collection; (add.info.: The War in the Transvaal, Canadian Mounted Police leaving Halifax, Nova Scotia)

Background imageColenso Collection: How Lord Robertss Son fell, saving Guns at Colenso, 15 December 1899 (engraving)

How Lord Robertss Son fell, saving Guns at Colenso, 15 December 1899 (engraving)
1599157 How Lord Robertss Son fell, saving Guns at Colenso, 15 December 1899 (engraving) by Stewart, Frank Algenon (1877-1945); Private Collection; (add.info.: How Lord Robertss Son fell)

Background imageColenso Collection: Dublins and Inniskillings across the Tugela (engraving)

Dublins and Inniskillings across the Tugela (engraving)
1599156 Dublins and Inniskillings across the Tugela (engraving) by Stewart, Frank Algenon (1877-1945); Private Collection; (add.info.: Dublins and Inniskillings across the Tugela)

Background imageColenso Collection: The Transvaal War, Casualties at the Front (b / w photo)

The Transvaal War, Casualties at the Front (b / w photo)
1599111 The Transvaal War, Casualties at the Front (b/w photo) by English Photographer, (20th century); Private Collection; (add.info.: The Transvaal War, Casualties at the Front)

Background imageColenso Collection: The War, with General Buller on the Tugela (litho)

The War, with General Buller on the Tugela (litho)
1600511 The War, with General Buller on the Tugela (litho) by Forestier, Amedee (1854-1930) (after); Private Collection; (add.info.: The War, with General Buller on the Tugela)

Background imageColenso Collection: The battle of Colenso: the loss of our guns (litho)

The battle of Colenso: the loss of our guns (litho)
3794453 The battle of Colenso: the loss of our guns (litho) by Woodville, Richard Caton II (1856-1927); Private Collection; (add.info.: Source unknown); English, out of copyright

Background imageColenso Collection: Victoria Cross: Lieut the Hon F Hs Roberts, at Colenso, 1899 (colour litho)

Victoria Cross: Lieut the Hon F Hs Roberts, at Colenso, 1899 (colour litho)
6019817 Victoria Cross: Lieut the Hon F Hs Roberts, at Colenso, 1899 (colour litho) by English School, (20th century); Private Collection; (add.info.: Lieut the Hon F Hs Roberts, at Colenso, 1899)

Background imageColenso Collection: The Rising of the Tugela, Boers cut off at Hlangwani Hill (engraving)

The Rising of the Tugela, Boers cut off at Hlangwani Hill (engraving)
1599262 The Rising of the Tugela, Boers cut off at Hlangwani Hill (engraving) by Stewart, Frank Algenon (1877-1945); Private Collection; (add.info.: The Rising of the Tugela)

Background imageColenso Collection: After Colenso, Troops around the Water-Cart, a Dhoolie-Bearer begging Water for a Wounded Soldier

After Colenso, Troops around the Water-Cart, a Dhoolie-Bearer begging Water for a Wounded Soldier (litho)
1599237 After Colenso, Troops around the Water-Cart, a Dhoolie-Bearer begging Water for a Wounded Soldier (litho) by Forestier

Background imageColenso Collection: The War in the Transvaal (b / w photo)

The War in the Transvaal (b / w photo)
1599873 The War in the Transvaal (b/w photo) by English Photographer, (20th century); Private Collection; (add.info.: The War in the Transvaal)

Background imageColenso Collection: The Scene of the Fighting at Monte Cristo Hill on February 19, 1900. Creator: Unknown

The Scene of the Fighting at Monte Cristo Hill on February 19, 1900. Creator: Unknown
The Scene of the Fighting at Monte Cristo Hill on February 19, 1900. Major-General Henry J. T. Hildyards 2nd Brigade captured the 1

Background imageColenso Collection: Balloon Map Illustrating the Battle of Pieters and Relief of Ladysmith, 1900. Creator: Unknown

Balloon Map Illustrating the Battle of Pieters and Relief of Ladysmith, 1900. Creator: Unknown
Balloon Map Illustrating the Battle of Pieters and Relief of Ladysmith, 1900. From " South Africa and the Transvaal War, Vol. IV", by Louis Creswicke. [T. C. & E. C. Jack, Edinburgh, 1900]

Background imageColenso Collection: Napier from Colenso Hill - New Zealand

Napier from Colenso Hill - New Zealand
Napier viewed from Colenso Hill, New Zealand. Date: circa 1909

Background imageColenso Collection: Palermo, Sicily, Italy - Monte Pellegrino and the port

Palermo, Sicily, Italy - Monte Pellegrino and the port
The Battlefield at Colenso - site of the heavy defeat of British forces by the Boers during the Second Boer War on 15th December 1899

Background imageColenso Collection: Tugela River, Natal, South Africa, Boer War, 1901. Artist: Underwood & Underwood

Tugela River, Natal, South Africa, Boer War, 1901. Artist: Underwood & Underwood
Tugela River, Natal, South Africa, Boer War, 1901. Where the Boers crossed over a bridge made of railway ties, The Boers were shelled later by Buller. Stereoscopic card. Detail

Background imageColenso Collection: Where the fallen heroes lie, foot of Harts Hill, Colenso, South Africa, Boer War, 1901

Where the fallen heroes lie, foot of Harts Hill, Colenso, South Africa, Boer War, 1901. Artist: Underwood & Underwood
Where the fallen heroes lie, foot of Harts Hill, Colenso, South Africa, Boer War, 1901. On 23 February 1900, during the Battle of the Tugela Heights

Background imageColenso Collection: Monument to the 27th Inniskillings, Harts Hill, near Colenso, Natal, South Africa, Boer War, 1901

Monument to the 27th Inniskillings, Harts Hill, near Colenso, Natal, South Africa, Boer War, 1901. On 23 February 1900, during the Battle of the Tugela Heights

Background imageColenso Collection: Middle Falls of the Tugela River from a Boer laager, near Colenso, South Africa, 2nd Boer War, 1901

Middle Falls of the Tugela River from a Boer laager, near Colenso, South Africa, 2nd Boer War, 1901. Colenso was the site of a major Boer victory over General Redvers Bullers Natal Field Force on 15

Background imageColenso Collection: John William Colenso, Bishop of Natal, 1875

John William Colenso, Bishop of Natal, 1875. Colenso (1814-1883) became the first Anglican Bishop of Natal in 1853. He became a controversial figure amongst the church hierarchy in Southern Africa

Background imageColenso Collection: The Battle Of Colenso, Natal, South Africa During The Second Boer War

The Battle Of Colenso, Natal, South Africa During The Second Boer War. The Last Desperate Attempt To Save The Guns Of The 14Th And 66Th Batteries

Background imageColenso Collection: The Battle Of Colenso, Natal, South Africa During The Second Boear War

The Battle Of Colenso, Natal, South Africa During The Second Boear War. Queens Royal West Surrey Regiment Leading The Central Attack

Background imageColenso Collection: The Relief Of Ladysmith, February 1900, The Last Rush At Hlangwane Hill

The Relief Of Ladysmith, February 1900, The Last Rush At Hlangwane Hill. From The Book South Africa And The Transvaal War By Louis Creswicke, Published 1900

Background imageColenso Collection: Taking A 4. 7 Naval Gun Across The Tugela River During The Battle Of Colenso, Natal

Taking A 4. 7 Naval Gun Across The Tugela River During The Battle Of Colenso, Natal, South Africa In 1899
Taking A 4.7 Naval Gun Across The Tugela River During The Battle Of Colenso, Natal, South Africa In 1899. From The Book South Africa And The Transvaal War By Louis Creswicke, Published 1900

Background imageColenso Collection: John William Colenso, 1814-1893. First Anglican Bishop Of Natal, South Africa

John William Colenso, 1814-1893. First Anglican Bishop Of Natal, South Africa

Background imageColenso Collection: Colenso Diamond

Colenso Diamond
A 133-carat diamond donated to the Natural History Museum in 1887 by the poet John Ruskin. It was stolen in 1965 and remains missing

Background imageColenso Collection: Colenso Diamond Wanted Poster

Colenso Diamond Wanted Poster
Poster offering reward of e750 for the return of the Colenso Diamond. On 29th April, 1965, from the Mineral Gallery at the Natural History Museum, Cromwell Rd, SW7

Background imageColenso Collection: Lower Tugela, Colenso, Natal Province, South Africa

Lower Tugela, Colenso, Natal Province, South Africa
Eshowe Railway Terminus, Lower Tugela (Thukela), Colenso, Natal Province, South Africa. Date: 1905


All Professionally Made to Order for Quick Shipping

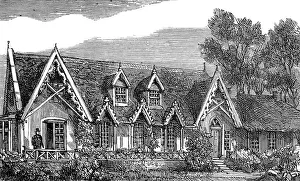
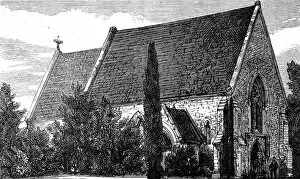
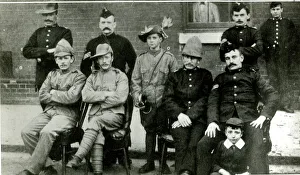
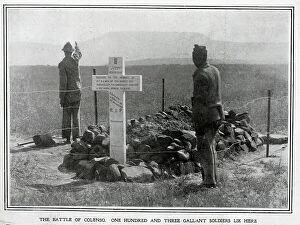
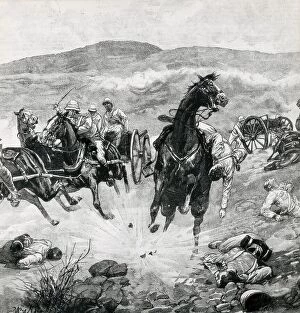
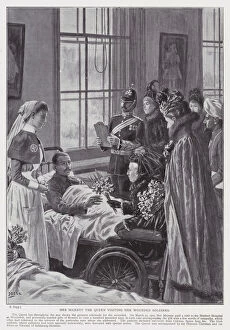
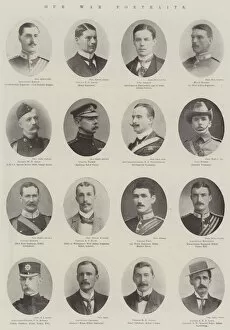
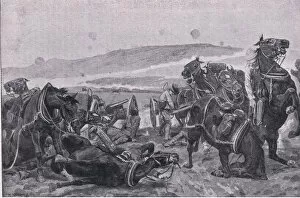
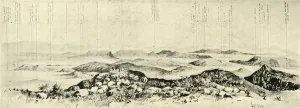
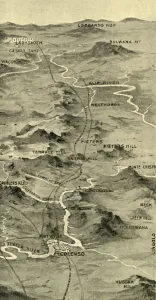
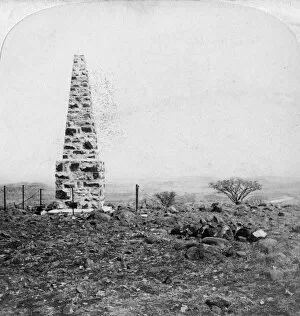
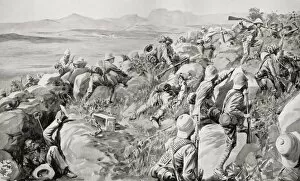
"Colenso: A Historical Journey Through Wars and Resilience" Step into the rich history of Colenso, a town that witnessed significant events during the Boer War and Zulu War. It was here that battles were fought, lives were lost, and stories of bravery unfolded. During the Boer War, Colenso became a crucial location in the conflict. The Battle marked a turning point as British forces faced fierce resistance from Boer fighters. Today, we pay tribute to those who sacrificed their lives with the Battle memorial. In addition to its wartime significance, Colenso holds historical ties to Bishopstowe - the residence of Bishop Colenso himself during the Zulu War. St Peters Church at Pietermaritz stands tall as a testament to his presence and influence in this region. The images captured during these tumultuous times are awe-inspiring. From group photos featuring young buglers ready for battle to Her Majesty Queen Victoria visiting wounded soldiers - each frame tells a story of courage and sacrifice. "The Last Shot at Colenso" immortalizes one moment forever etched in history while "Buller awarding VCs" captures heroes being honored for their exceptional valor on the battlefield. Not all moments were filled with bloodshed; some depict encounters between enemies before battle commenced – like "A Brush with Enemy before Colenso. " These engravings remind us that humanity can still prevail even amidst conflict. Our war portraits offer glimpses into individual experiences - faces etched with determination or weariness tell tales untold but not forgotten. Each portrait is an ode to resilience and strength displayed by those who fought bravely for their beliefs. Frere Bridge serves as a reminder of Natal Government Railways' first blow dealt by retreating Boers from Estcourt to Colenso – an act that left lasting scars on both infrastructure and hearts alike. Colenso's past is intertwined with tales from two wars, but its present is a testament to the spirit of its people.