Home > Africa > South Africa > Related Images
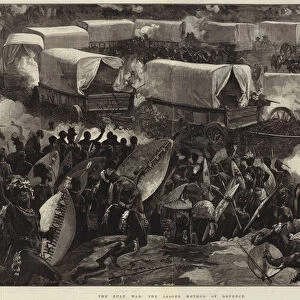
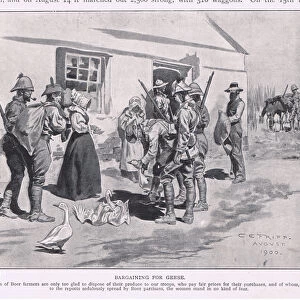
The Zulu War, Destruction of Dabulamanzis Kraal, 4 April (engraving)
")
![]()
Wall Art and Photo Gifts from Fine Art Finder
The Zulu War, Destruction of Dabulamanzis Kraal, 4 April (engraving)
1059036 The Zulu War, Destruction of Dabulamanzis Kraal, 4 April (engraving) by Fripp, Charles Edwin (1854-1906); Private Collection; (add.info.: The Zulu War, Destruction of Dabulamanzis Kraal, 4 April. Illustration for The Graphic, 7 June 1879.); Look and Learn / Illustrated Papers Collection; English, out of copyright
Media ID 23562456
© Look and Learn / Illustrated Papers Collection / Bridgeman Images
FEATURES IN THESE COLLECTIONS
> Africa
> South Africa
> Related Images
> Fine Art Finder
> Artists
> Charles Edwin Fripp
> Fine Art Finder
> Artists
> John Melhuish Strudwick
> Fine Art Finder
> Temp Classification
EDITORS COMMENTS
This engraving by Charles Edwin Fripp depicts the intense destruction of Dabulamanzis Kraal during the Zulu War on 4 April. The image, originally published in The Graphic on 7 June 1879, offers a dramatic glimpse into the chaos and devastation that unfolded during this historic conflict. In the foreground, fires rage uncontrollably as soldiers on horseback navigate through the chaotic scene. The artist skillfully captures the sense of urgency and danger, with billowing smoke obscuring parts of the kraal in ruins. Every detail is meticulously rendered, from crumbling structures to fallen debris strewn across the landscape. The Zulu War was a pivotal moment in South African history, marked by fierce battles between British forces and Zulu warriors. This engraving serves as a poignant reminder of the violence and destruction that accompanied these clashes. Fripp's work not only showcases his artistic talent but also provides valuable historical documentation. It allows us to reflect upon this significant event and gain insight into its impact on both sides involved. As we gaze upon this print today, it serves as a testament to human resilience amidst adversity while reminding us of our collective responsibility to learn from past conflicts and strive for peace.
MADE IN THE USA
Safe Shipping with 30 Day Money Back Guarantee
FREE PERSONALISATION*
We are proud to offer a range of customisation features including Personalised Captions, Color Filters and Picture Zoom Tools
SECURE PAYMENTS
We happily accept a wide range of payment options so you can pay for the things you need in the way that is most convenient for you
* Options may vary by product and licensing agreement. Zoomed Pictures can be adjusted in the Cart.