Home > Europe > United Kingdom > England > London > Museums > National Army Museum
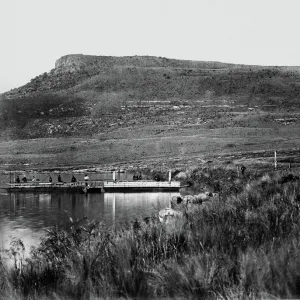
Isandlwana Mountain, 1879 (b / w photo)
")
![]()
Wall Art and Photo Gifts from Fine Art Finder
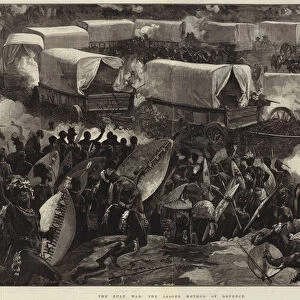
Isandlwana Mountain, 1879 (b / w photo)
NAM261154 Isandlwana Mountain, 1879 (b/w photo) by English Photographer, (19th century); National Army Museum, London; (add.info.: from a photograph album containing photographs of scenes in India, South Africa and the Zulu War; site of British defeat on 22nd of January, 1879; ); eNational Army Museum; English, out of copyright
Media ID 22660884
© National Army Museum / Bridgeman Images
Aftermath Carts Cliff Hitch Outcrop Rocky Waggons Wagon Wagons Battle Of Isandlwana Coupling
FEATURES IN THESE COLLECTIONS
> Africa
> South Africa
> Related Images
> Arts
> Artists
> Related Images
> Asia
> India
> Related Images
> Europe
> United Kingdom
> England
> London
> Museums
> British Museum
> Europe
> United Kingdom
> England
> London
> Museums
> National Army Museum
> Fine Art Finder
> Artists
> English Photographer
> Fine Art Finder
> War & Military Scenes Pre-20th Century
EDITORS COMMENTS
This photograph captures the haunting beauty of Isandlwana Mountain in 1879. Taken by an English photographer, this image is part of a larger collection that showcases scenes from India, South Africa, and the infamous Zulu War. Isandlwana Mountain holds a significant place in history as it was the site of a devastating British defeat on January 22nd, 1879. The aftermath of this battle is evident in the photo, with carts and wagons scattered across the rocky hillside. The rugged cliffs and outcrops surrounding the mountain add to its majestic allure. The image provides a glimpse into the transport logistics during that time period, with hitched wagons and coupled carts dotting the landscape. It serves as a reminder of both human ingenuity and vulnerability amidst nature's grandeur. Preserved at London's National Army Museum, this print offers viewers an opportunity to reflect on past conflicts while appreciating the artistry behind early photography. As we gaze upon this historic scene captured over a century ago, we are transported back in time to witness firsthand how war can shape landscapes forever. Bridgeman Images has made this remarkable piece available for public viewing without any commercial restrictions. So let us immerse ourselves in its depth and detail; let us ponder upon its historical significance; let us remember those who fought bravely amidst these very mountains all those years ago.
MADE IN THE USA
Safe Shipping with 30 Day Money Back Guarantee
FREE PERSONALISATION*
We are proud to offer a range of customisation features including Personalised Captions, Color Filters and Picture Zoom Tools
SECURE PAYMENTS
We happily accept a wide range of payment options so you can pay for the things you need in the way that is most convenient for you
* Options may vary by product and licensing agreement. Zoomed Pictures can be adjusted in the Cart.