Home > Arts > Artists > E > Richard Evans
Framed Print : Admiral Beatty and Flag-Captain Chatfield


![]()
Framed Photos from Mary Evans Picture Library
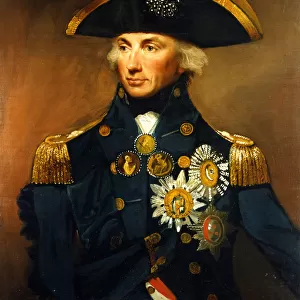
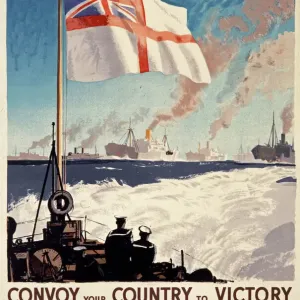
Admiral Beatty and Flag-Captain Chatfield
Admiral of the Fleet Sir David Richard Beatty, 1st Earl Beatty (1871-1936) and Admiral of the Fleet Alfred Ernle Montacute Chatfield, 1st Baron Chatfield (1873-1967) (at the time Admiral and Flag-Captain respectively), watching the approach of the German Fleet from the bridge of the Grand Fleet Flagship HMS Queen Elizabeth, before giving the signal. Beatty received the surrender of the German High Seas Fleet in November 1918, at the end of the First World War. Date: 21 November 1918
Mary Evans Picture Library makes available wonderful images created for people to enjoy over the centuries
Media ID 7189355
© Mary Evans Picture Library 2015 - https://copyrighthub.org/s0/hub1/creation/maryevans/MaryEvansPictureID/10511557
Admiral Approach Baron Beatty Deck Flagship Montacute Signal Surrender Watching Elizabeth
22"x18" Modern Frame
Introducing the latest addition to our Media Storehouse Framed Prints collection: "Admiral Beatty and Flag-Captain Chatfield" by Rights Managed from Mary Evans Prints Online. This stunning framed print depicts two legendary figures of the Royal Navy, Admiral of the Fleet Sir David Richard Beatty, 1st Earl Beatty (1871-1936) and Admiral of the Fleet Alfred Ernle Montacute Chatfield (1869-1936). Captured in this timeless image, their unwavering leadership and determination are evident. The intricately detailed print is brought to life with a beautiful frame, adding an elegant touch to any room. Perfect for naval history enthusiasts or those who appreciate fine art, this framed print is a must-have for your collection. Order yours today and bring a piece of history into your home.
20x16 Print in an MDF Wooden Frame with 180 gsm Satin Finish Paper. Glazed using shatter proof thin plexiglass. Frame thickness is 1 inch and depth 0.75 inch. Fluted cardboard backing held with clips. Supplied ready to hang with sawtooth hanger and rubber bumpers. Spot clean with a damp cloth. Packaged foam wrapped in a card.
Contemporary Framed and Mounted Prints - Professionally Made and Ready to Hang
Estimated Image Size (if not cropped) is 45.7cm x 50.8cm (18" x 20")
Estimated Product Size is 45.7cm x 55.9cm (18" x 22")
These are individually made so all sizes are approximate
Artwork printed orientated as per the preview above, with portrait (vertical) orientation to match the source image.
FEATURES IN THESE COLLECTIONS
> Arts
> Artists
> D
> Alfred
> Related Images
> Arts
> Artists
> E
> David Evans
> Arts
> Artists
> E
> Richard Evans
> Historic
> World War I and II
> Naval warfare
> Services
> Royal Navy
EDITORS COMMENTS
In this historic photograph, Admiral Beatty and Flag-Captain Chatfield, both clad in full naval uniform, intently watch the approach of the German Fleet from the bridge of the Grand Fleet Flagship, HMS Queen Elizabeth, on November 21, 1918. At the time, Admiral Beatty held the rank of Admiral of the Fleet, while Flag-Captain Chatfield was Admiral of the Fleet and 1st Baron Chatfield. The two naval officers stand resolute and focused, their gaze fixed on the horizon as they prepare to give the signal for the final engagement of the First World War. The German High Seas Fleet, having been bottled up in its home port of Wilhelmshaven since the beginning of the war, was finally lured out by a daring British naval maneuver. The sight of the German ships on the horizon marked the beginning of the end for the German Navy. Just a few hours later, Admiral Beatty would receive the formal surrender of the German Fleet, effectively ending the war at sea. The photograph captures a pivotal moment in naval history, with two of the most prominent figures in the British Navy standing together, poised to bring about a decisive victory. The image is a testament to their leadership, determination, and the unwavering resolve of the Grand Fleet. The scene on the bridge of HMS Queen Elizabeth is one of intense focus and anticipation, as the outcome of the battle and the war hangs in the balance.
MADE IN THE USA
Safe Shipping with 30 Day Money Back Guarantee
FREE PERSONALISATION*
We are proud to offer a range of customisation features including Personalised Captions, Color Filters and Picture Zoom Tools
FREE COLORIZATION SERVICE
You can choose advanced AI Colorization for this picture at no extra charge!
SECURE PAYMENTS
We happily accept a wide range of payment options so you can pay for the things you need in the way that is most convenient for you
* Options may vary by product and licensing agreement. Zoomed Pictures can be adjusted in the Cart.