Fine Art Print : Boer War : Spion Kop


![]()
Fine Art Prints from Mary Evans Picture Library
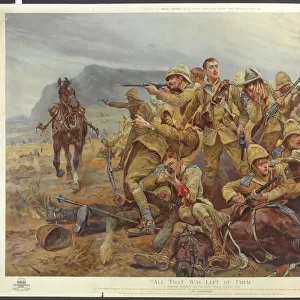
Boer War : Spion Kop
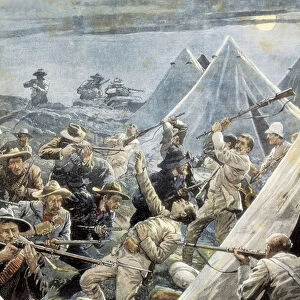
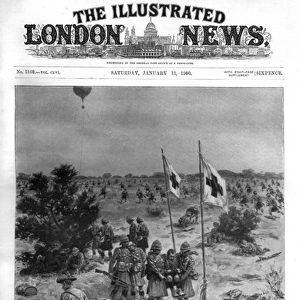
BATTLE OF SPION KOP A British night attack takes this strategic obstacle to the advance on Ladysmith; but they are unable to hold it and have to abandon it
Mary Evans Picture Library makes available wonderful images created for people to enjoy over the centuries
Media ID 615332
© Mary Evans Picture Library 2015 - https://copyrighthub.org/s0/hub1/creation/maryevans/MaryEvansPictureID/10097488
Abandon Advance Attack Boer Hold Ladysmith Obstacle Spion Strategic Takes Unable January
21"x14" (+3" Border) Fine Art Print
Experience the historical drama of the Boer War with our Fine Art Print from Media Storehouse, featuring the iconic image of the Battle of Spion Kop. Witness the courage and determination of British forces as they launch a night attack on this strategic obstacle during their advance on Ladysmith. Despite their initial success, they are ultimately forced to abandon the position. This exquisitely detailed print from Mary Evans Prints Online transports you back in time, providing a captivating glimpse into the past. Perfect for history enthusiasts, art collectors, or anyone seeking to adorn their walls with a piece of historical significance.
21x14 image printed on 27x20 Fine Art Rag Paper with 3" (76mm) white border. Our Fine Art Prints are printed on 300gsm 100% acid free, PH neutral paper with archival properties. This printing method is used by museums and art collections to exhibit photographs and art reproductions.
Our fine art prints are high-quality prints made using a paper called Photo Rag. This 100% cotton rag fibre paper is known for its exceptional image sharpness, rich colors, and high level of detail, making it a popular choice for professional photographers and artists. Photo rag paper is our clear recommendation for a fine art paper print. If you can afford to spend more on a higher quality paper, then Photo Rag is our clear recommendation for a fine art paper print.
Estimated Image Size (if not cropped) is 35.5cm x 51.4cm (14" x 20.2")
Estimated Product Size is 50.8cm x 68.6cm (20" x 27")
These are individually made so all sizes are approximate
Artwork printed orientated as per the preview above, with portrait (vertical) orientation to match the source image.
EDITORS COMMENTS
This evocative photograph captures the aftermath of the Battle of Spion Kop, a pivotal moment in the Second Boer War in South Africa. In this image, weary British soldiers are seen making their way down the slopes of Spion Kop, a strategic hill overlooking the town of Ladysmith, following an unsuccessful night attack. The hill had been taken by the British on January 23, 1900, but they were unable to hold the position against the determined resistance of the Boer forces. The Battle of Spion Kop was one of the most significant engagements of the Second Boer War, which lasted from 1899 to 1902. The hill, which stands at over 2,000 feet high, had been a major obstacle to the British advance on Ladysmith, a key Boer stronghold. The British had launched a night attack on the hill, hoping to surprise the Boers and secure a decisive victory. However, the attack was poorly coordinated, and the British were unable to maintain their position once they had taken the hill. Despite their failure to hold Spion Kop, the British continued their advance on Ladysmith, eventually taking the town in February 1900. The Battle of Spion Kop marked a turning point in the war, as the British were able to demonstrate their ability to mount successful attacks against the Boer defenses. The battle also highlighted the tenacity and determination of the Boer forces, who were able to hold out against the British despite being outnumbered and outgunned. This photograph is a poignant reminder of the sacrifices made by soldiers on both sides during the Second Boer War. It also serves as a testament to the enduring historical significance of this conflict, which shaped the political and social landscape of South Africa for generations to come.
MADE IN THE USA
Safe Shipping with 30 Day Money Back Guarantee
FREE PERSONALISATION*
We are proud to offer a range of customisation features including Personalised Captions, Color Filters and Picture Zoom Tools
SECURE PAYMENTS
We happily accept a wide range of payment options so you can pay for the things you need in the way that is most convenient for you
* Options may vary by product and licensing agreement. Zoomed Pictures can be adjusted in the Cart.