Home > Africa > Related Images
Lantern / Zulu / Ulundi

![]()
Wall Art and Photo Gifts from Mary Evans Picture Library
Lantern / Zulu / Ulundi
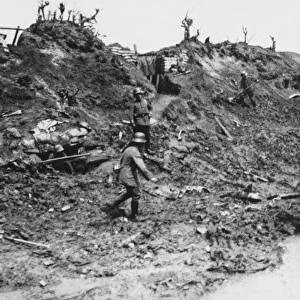
The Battle of Ulundi
Mary Evans Picture Library makes available wonderful images created for people to enjoy over the centuries
Media ID 621801
© Mary Evans Picture Library 2015 - https://copyrighthub.org/s0/hub1/creation/maryevans/MaryEvansPictureID/10077137
FEATURES IN THESE COLLECTIONS
> Africa
> Related Images
> Historic
> Battles
> Related Images
EDITORS COMMENTS
This evocative image captures the aftermath of the Battle of Ulundi, a pivotal moment in the Anglo-Zulu War of 1879. The Battle of Ulundi, fought on July 4, 1879, marked the final engagement of the war and resulted in a decisive British victory over the Zulu army. In this photograph, a Zulu warrior is shown carrying a wounded comrade on his back, both of them surrounded by the ruins of the royal kraal of Ulundi. The once-majestic huts, now reduced to smoldering ruins, bear testament to the devastating impact of the battle. In the background, British soldiers can be seen marching through the scene, having secured their victory. The Anglo-Zulu War was a significant event in the history of South Africa, marking the end of the Zulu Empire and the beginning of British colonial rule. The war was sparked by King Cetewayo's refusal to pay tribute to the British and the resulting invasion of Zulu territory. The Battle of Ulundi was the culmination of a series of engagements that saw the Zulu army outmaneuvered and outgunned by the British. The photograph provides a poignant reminder of the human cost of war, with the wounded Zulu warrior carrying his comrade on his back, symbolizing the camaraderie and sacrifice that often accompany conflict. The image also serves as a visual record of a pivotal moment in the history of South Africa, offering a glimpse into the past and the complex dynamics of colonialism and resistance.
MADE IN THE USA
Safe Shipping with 30 Day Money Back Guarantee
FREE PERSONALISATION*
We are proud to offer a range of customisation features including Personalised Captions, Color Filters and Picture Zoom Tools
SECURE PAYMENTS
We happily accept a wide range of payment options so you can pay for the things you need in the way that is most convenient for you
* Options may vary by product and licensing agreement. Zoomed Pictures can be adjusted in the Cart.