Jigsaw Puzzle : John King / Explorer


![]()
Jigsaw Puzzles from Mary Evans Picture Library
John King / Explorer
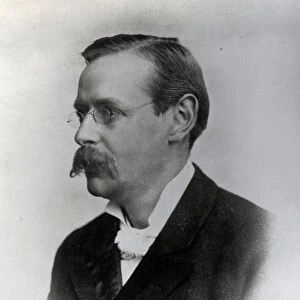
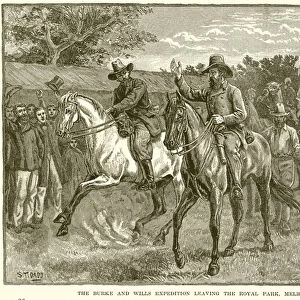
JOHN KING Explorer; part of the Burke and Wills expedition to Australia
Mary Evans Picture Library makes available wonderful images created for people to enjoy over the centuries
Media ID 620607
© Mary Evans Picture Library 2015 - https://copyrighthub.org/s0/hub1/creation/maryevans/MaryEvansPictureID/10073786
1841 1872 Burke Explorer Wills
Jigsaw Puzzle (252 Pieces)
Discover the thrill of piecing together history with the Media Storehouse collection of Jigsaw Puzzles. Our latest addition brings you closer to the past with "John King Explorer," an intriguing puzzle from Mary Evans Picture Library. This captivating jigsaw showcases an iconic image of John King, an intrepid explorer who was a part of the legendary Burke and Wills expedition to Australia in 1860. As you meticulously fit each piece into place, you'll uncover the story of this brave adventurer and immerse yourself in the rich history of early Australian exploration. Engage your mind, challenge your problem-solving skills, and bring this piece of history to life - one puzzle piece at a time.
Made in the USA, 252-piece puzzles measure 11" x 14" (27.9 x 35.5 cm). Every puzzle is meticulously printed on glossy photo paper, which has a strong 1.33 mm thickness. Delivered in a black storage cardboard box, these puzzles are both stylish and practical. (Note: puzzles contain small parts and are not suitable for children under 3 years of age.)
Jigsaw Puzzles are an ideal gift for any occasion
Estimated Product Size is 28cm x 35.6cm (11" x 14")
These are individually made so all sizes are approximate
Artwork printed orientated as per the preview above, with portrait (vertical) orientation to match the source image.
EDITORS COMMENTS
John King, a prominent figure in the history of Australian exploration, is depicted in this photograph taken in the late 1870s. King, born in England in 1816, embarked on a remarkable journey as a member of the ill-fated Burke and Wills expedition, which aimed to be the first to cross Australia from south to north. The expedition, led by Robert O'Hara Burke and William John Wills, commenced in Melbourne on August 20, 1860. King, an experienced soldier and surveyor, was appointed as the third-in-command. The group set out with 19 men, 27 camels, and 26 horses, intending to cross the harsh and uncharted interior of the continent. Tragically, the expedition faced numerous challenges, including extreme weather conditions, limited supplies, and a lack of knowledge about the terrain. By the time they reached Coopers Creek in May 1861, they had lost several members and were in dire straits. King, Burke, and Wills decided to split the group, with King leading a smaller party to attempt to reach the coastal town of Port Essington, while Burke and Wills continued westward. Despite his best efforts, King was unable to reach Port Essington and eventually succumbed to exhaustion and starvation. He was found dead near the Cooper's Creek site in 1862. Burke and Wills, meanwhile, also faced numerous hardships and ultimately both perished in late 1861. This photograph of John King, taken over a decade after his death, serves as a poignant reminder of the sacrifices made by these early Australian explorers in their quest to chart the vast and unforgiving landscape of the continent. The image captures the resilience and determination that defined King's life and his role in the Burke and Wills expedition, which remains a significant chapter in the history of Australian exploration.
MADE IN THE USA
Safe Shipping with 30 Day Money Back Guarantee
FREE PERSONALISATION*
We are proud to offer a range of customisation features including Personalised Captions, Color Filters and Picture Zoom Tools
FREE COLORIZATION SERVICE
You can choose advanced AI Colorization for this picture at no extra charge!
SECURE PAYMENTS
We happily accept a wide range of payment options so you can pay for the things you need in the way that is most convenient for you
* Options may vary by product and licensing agreement. Zoomed Pictures can be adjusted in the Cart.