Fraud Blocker Skip to main content

Tibet Collection (page 4)

Tibet, a land of enchantment and spirituality nestled in the heart of Asia

Background imageTibet Collection: A time to pray

A time to pray
Nicolas Marino

Background imageTibet Collection: Where I like to sleep

Where I like to sleep
Nicolas Marino

Background imageTibet Collection: My golden Kitchen

My golden Kitchen
Nicolas Marino

Background imageTibet Collection: Return of the Prince of Wales from India: life on board the Serapis: Pony and Thibet Dog...1876

Return of the Prince of Wales from India: life on board the Serapis: Pony and Thibet Dog...1876. Creator: Unknown
Return of the Prince of Wales from India: life on board the Serapis: Pony and Thibet Dog, from a sketch by an officer of the Serapis

Background imageTibet Collection: The Prince's Voyage Home from India...Himalayan Black Bear and tailless dog...1876. Creator: W. J. P

The Prince's Voyage Home from India...Himalayan Black Bear and tailless dog...1876. Creator: W. J. P
The Prince's Voyage Home from India: life on board the Serapis: Himalayan Black Bear and tailless dogs, from a sketch by an officer of the Serapis, 1876

Background imageTibet Collection: Vajradhara with Mahasiddhas, c1400. Creator: Unknown

Vajradhara with Mahasiddhas, c1400. Creator: Unknown
Vajradhara with Mahasiddhas, c1400. Vajradhara, the primordial Buddha, is considered to be the original teacher of the tantric Buddhist (Vajrayana) teachings

Background imageTibet Collection: A Buddha in a Shrine, Folio from a Shatasahasrika Prajnaparamita... 11th-13th century (?)

A Buddha in a Shrine, Folio from a Shatasahasrika Prajnaparamita... 11th-13th century (?). Creator: Unknown
A Buddha in a Shrine, Folio from a Shatasahasrika Prajnaparamita (The Perfection of Wisdom in 100, 000 Verses) (image 2 of 2), 11th-13th century (?)

Background imageTibet Collection: Power of Faith, Folio from a Shatasahasrika Prajnaparamita... 11th century. Creator: Unknown

Power of Faith, Folio from a Shatasahasrika Prajnaparamita... 11th century. Creator: Unknown
Power of Faith, Folio from a Shatasahasrika Prajnaparamita (The Perfection of Wisdom in 100, 000 Verses) (image 2 of 2), 11th century

Background imageTibet Collection: Yama and Yami (image 1 of 21), between c1675 and c1725. Creator: Anon

Yama and Yami (image 1 of 21), between c1675 and c1725. Creator: Anon
Yama and Yami (image 1 of 21), between c1675 and c1725

Background imageTibet Collection: Pair of Votive Tablets with a Buddhist Deity, 18th-19th century. Creator: Unknown

Pair of Votive Tablets with a Buddhist Deity, 18th-19th century. Creator: Unknown
Pair of Votive Tablets with a Buddhist Deity, 18th-19th century

Background imageTibet Collection: Padmasambhava (Guru Rinpoche, 8th cent) in his form as Dorje Drölö, Subduer of Demons

Padmasambhava (Guru Rinpoche, 8th cent) in his form as Dorje Drölö, Subduer of Demons, 18th century. Creator: Unknown
Padmasambhava (Guru Rinpoche, 8th century) in his form as Dorje Drolo, Subduer of Demons, 18th century

Background imageTibet Collection: Apron Plaque with a Dancing Goddess, 17th-18th century. Creator: Unknown

Apron Plaque with a Dancing Goddess, 17th-18th century. Creator: Unknown
Apron Plaque with a Dancing Goddess, 17th-18th century

Background imageTibet Collection: Padmasambhava (Guru Rinpoche, 8th century), 17th century. Creator: Unknown

Padmasambhava (Guru Rinpoche, 8th century), 17th century. Creator: Unknown
Padmasambhava (Guru Rinpoche, 8th century), 17th century

Background imageTibet Collection: Vajrabhairava, 17th century. Creator: Unknown

Vajrabhairava, 17th century. Creator: Unknown
Vajrabhairava, 17th century

Background imageTibet Collection: Yama and Yami, 17th century. Creator: Unknown

Yama and Yami, 17th century. Creator: Unknown
Yama and Yami, 17th century

Background imageTibet Collection: Karma Pakshi (1206-1283) (image 1 of 2), 17th century. Creator: Unknown

Karma Pakshi (1206-1283) (image 1 of 2), 17th century. Creator: Unknown
Karma Pakshi (1206-1283) (image 1 of 2), 17th century

Background imageTibet Collection: The Buddhist Goddess Vajravarahi, 17th century. Creator: Unknown

The Buddhist Goddess Vajravarahi, 17th century. Creator: Unknown
The Buddhist Goddess Vajravarahi, 17th century

Background imageTibet Collection: Cosmic Form of the Bodhisattva Avalokiteshvara, 17th century. Creator: Unknown

Cosmic Form of the Bodhisattva Avalokiteshvara, 17th century. Creator: Unknown
Cosmic Form of the Bodhisattva Avalokiteshvara, 17th century

Background imageTibet Collection: Dakini on a Gray Dog, Nyingmapa Buddhist or Bon Ritual Card, 18th-19th century. Creator: Unknown

Dakini on a Gray Dog, Nyingmapa Buddhist or Bon Ritual Card, 18th-19th century. Creator: Unknown
Dakini on a Gray Dog, Nyingmapa Buddhist or Bon Ritual Card, 18th-19th century

Background imageTibet Collection: Eleven-Headed Avalokiteshvara, 16th century. Creator: Unknown

Eleven-Headed Avalokiteshvara, 16th century. Creator: Unknown
Eleven-Headed Avalokiteshvara, 16th century

Background imageTibet Collection: Sonam Tsemo (1142-1182) (image 1 of 2), 16th century. Creator: Unknown

Sonam Tsemo (1142-1182) (image 1 of 2), 16th century. Creator: Unknown
Sonam Tsemo (1142-1182) (image 1 of 2), 16th century

Background imageTibet Collection: Khenchen Tashi Tshultrim and His Ordination Lineage, c1400. Creator: Unknown

Khenchen Tashi Tshultrim and His Ordination Lineage, c1400. Creator: Unknown
Khenchen Tashi Tshultrim and His Ordination Lineage, c1400. This masterful and meticulous portrait shows an abbot within a niche - one ornamented with lively scrollwork influenced by the traditions

Background imageTibet Collection: The Buddhist Goddess Nairatmya, 16th century. Creator: Unknown

The Buddhist Goddess Nairatmya, 16th century. Creator: Unknown
The Buddhist Goddess Nairatmya, 16th century

Background imageTibet Collection: Abbots of the Ngor Monastery, late 16th century. Creator: Unknown

Abbots of the Ngor Monastery, late 16th century. Creator: Unknown
Abbots of the Ngor Monastery, late 16th century. The first two abbots of the Ngor Monastery in central Tibet, the older Sempa Chenpo and the younger Jamyang Sherab Gyatsho

Background imageTibet Collection: Green Tara, 1160s-1180s. Creator: Unknown

Green Tara, 1160s-1180s. Creator: Unknown
Green Tara, 1160s-1180s. This Buddhist "thangka" (or "thanka, " scroll painting) depicts the enlightened Buddha and compassionate goddess Tara

Background imageTibet Collection: Portrait of a Tibetan Monk, 12th century. Creator: Unknown

Portrait of a Tibetan Monk, 12th century. Creator: Unknown
Portrait of a Tibetan Monk, 12th century. Wearing the robes of a Tibetan Buddhist monk, the individual depicted in this portrait was probably a teacher of the Kadampa order

Background imageTibet Collection: Mahasiddhas Shavaripa and Dharikapa, c1600. Creator: Unknown

Mahasiddhas Shavaripa and Dharikapa, c1600. Creator: Unknown
Mahasiddhas Shavaripa and Dharikapa, c1600. Painted in a style closely related to Chinese painting, two of the eighty-four mahasiddhas ("great perfected ones")

Background imageTibet Collection: Vajrabhairava with Vajravetali, 18th century. Creator: Unknown

Vajrabhairava with Vajravetali, 18th century. Creator: Unknown
Vajrabhairava with Vajravetali, 18th century. The enlightened wrathful deity Vajrabhairava, Buddhist conqueror of death, embraces his female partner, Vajravetali

Background imageTibet Collection: Arhat Rahula, 1400-1450. Creator: Unknown

Arhat Rahula, 1400-1450. Creator: Unknown
Arhat Rahula, 1400-1450. The Buddha Shakyamuni had a son named Rahula, who became a disciple of his father. Tibetan monks regard him as a spiritual ancestor

Background imageTibet Collection: Padmasambhava (Guru Rinpoche, 8th century) (image 1 of 6), 15th-16th century. Creator: Unknown

Padmasambhava (Guru Rinpoche, 8th century) (image 1 of 6), 15th-16th century. Creator: Unknown
Padmasambhava (Guru Rinpoche, 8th century) (image 1 of 6), 15th-16th century

Background imageTibet Collection: Buddha Shakyamuni with 'Jataka' Tales, late 17th-early 18th century. Creator: Unknown

Buddha Shakyamuni with "Jataka" Tales, late 17th-early 18th century. Creator: Unknown
Buddha Shakyamuni with "Jataka" Tales, late 17th-early 18th century. The Buddha Shakyamuni, who lived in the 6th-5th century BC, is shown here telling stories of his previous existences

Background imageTibet Collection: Lama Dance at Jummoo, performed before the Prince of Wales...1876. Creator: W. H. O

Lama Dance at Jummoo, performed before the Prince of Wales...1876. Creator: W. H. O
Lama Dance at Jummoo, performed before the Prince of Wales, from a sketch by one of our special artists, 1876....a weird terrible performance of Lamas from Thibet...[there were] four large brazen

Background imageTibet Collection: The Mahasiddha (Great Adept) Naropa (956-1040), 15th-16th century. Creator: Unknown

The Mahasiddha (Great Adept) Naropa (956-1040), 15th-16th century. Creator: Unknown
The Mahasiddha (Great Adept) Naropa (956-1040), 15th-16th century

Background imageTibet Collection: Raktayamari and Vajravetali, early 14th century. Creator: Unknown

Raktayamari and Vajravetali, early 14th century. Creator: Unknown
Raktayamari and Vajravetali, early 14th century. The Buddhist deity Raktayamari embraces his female partner, Vajravetali, their union symbolizing the bliss of enlightenment

Background imageTibet Collection: Kuyalwa, Second Abbot of Taklung Monastery, with Three Lineages, mid-13th century. Creator: Unknown

Kuyalwa, Second Abbot of Taklung Monastery, with Three Lineages, mid-13th century. Creator: Unknown
Kuyalwa, Second Abbot of Taklung Monastery, with Three Lineages, mid-13th century. This painting commemorates Kuyalwa (1191-1236), the second abbot of Taklung Monastery in central Tibet

Background imageTibet Collection: Vajrayogini as Naro Dakini, 18th century. Creator: Unknown

Vajrayogini as Naro Dakini, 18th century. Creator: Unknown
Vajrayogini as Naro Dakini, 18th century. The goddess and Buddha Vajrayogini lunges powerfully as she tramples two figures that symbolize the three mental poisons: delusion, hatred, and desire

Background imageTibet Collection: The Mahasiddha (Great Adept) Virupa, 837-909 (image 1 of 2), 15th century. Creator: Unknown

The Mahasiddha (Great Adept) Virupa, 837-909 (image 1 of 2), 15th century. Creator: Unknown
The Mahasiddha (Great Adept) Virupa, 837-909 (image 1 of 2), 15th century

Background imageTibet Collection: Stupa (Tibetan: Chöten) with Relics (image 2 of 2), 15th century. Creator: Unknown

Stupa (Tibetan: Chöten) with Relics (image 2 of 2), 15th century. Creator: Unknown
Stupa (Tibetan: Choten) with Relics (image 2 of 2), 15th century

Background imageTibet Collection: Stupa (Tibetan: Chöten) with Relics (image 1 of 2), 15th century. Creator: Unknown

Stupa (Tibetan: Chöten) with Relics (image 1 of 2), 15th century. Creator: Unknown
Stupa (Tibetan: Choten) with Relics (image 1 of 2), 15th century

Background imageTibet Collection: Apron Plaque with Chakrasamvara and Vajravarahi, 15th century. Creator: Unknown

Apron Plaque with Chakrasamvara and Vajravarahi, 15th century. Creator: Unknown
Apron Plaque with Chakrasamvara and Vajravarahi, 15th century

Background imageTibet Collection: The Bodhisattva Vajrapani (Tibetan: Chana Dorje) and His Consort, 15th century. Creator: Unknown

The Bodhisattva Vajrapani (Tibetan: Chana Dorje) and His Consort, 15th century. Creator: Unknown
The Bodhisattva Vajrapani (Tibetan: Chana Dorje) and His Consort, 15th century

Background imageTibet Collection: Portrait of a Monk, 14th century. Creator: Unknown

Portrait of a Monk, 14th century. Creator: Unknown
Portrait of a Monk, 14th century

Background imageTibet Collection: Throneback Panel, 14th century. Creator: Unknown

Throneback Panel, 14th century. Creator: Unknown
Throneback Panel, 14th century

Background imageTibet Collection: Buddha Shakyamuni or the Jina Buddha Akshobhya (image 1 of 2), 14th century. Creator: Unknown

Buddha Shakyamuni or the Jina Buddha Akshobhya (image 1 of 2), 14th century. Creator: Unknown
Buddha Shakyamuni or the Jina Buddha Akshobhya (image 1 of 2), 14th century

Background imageTibet Collection: The Buddhist God Hayagriva and his Consort, 13th-14th century. Creator: Unknown

The Buddhist God Hayagriva and his Consort, 13th-14th century. Creator: Unknown
The Buddhist God Hayagriva and his Consort, 13th-14th century

Background imageTibet Collection: Phagpa Lokeshvara (Copy of the original in the Potala, Lhasa, Tibet), 13th-14th century

Phagpa Lokeshvara (Copy of the original in the Potala, Lhasa, Tibet), 13th-14th century. Creator: Unknown
Phagpa Lokeshvara (Copy of the original in the Potala, Lhasa, Tibet), 13th-14th century

Background imageTibet Collection: Ritual Diadem Plaque with the Jina Buddha Amoghasiddhi, 13th-14th century. Creator: Unknown

Ritual Diadem Plaque with the Jina Buddha Amoghasiddhi, 13th-14th century. Creator: Unknown
Ritual Diadem Plaque with the Jina Buddha Amoghasiddhi, 13th-14th century

Background imageTibet Collection: The Bodhisattva Manjushri, 13th century. Creator: Unknown

The Bodhisattva Manjushri, 13th century. Creator: Unknown
The Bodhisattva Manjushri, 13th century


All Professionally Made to Order for Quick Shipping

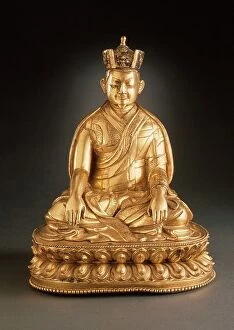
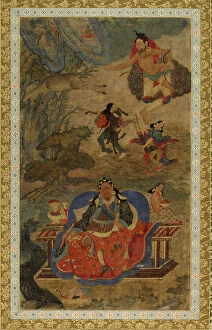
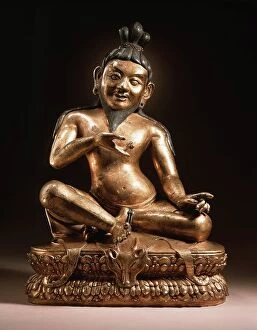
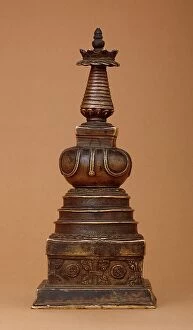
Tibet, a land of enchantment and spirituality nestled in the heart of Asia. With its rich cultural heritage and breathtaking landscapes, it captivates the souls of all who venture into its realm. At the core of Tibetan culture lies Tibetan Buddhism, an ancient tradition that permeates every aspect of life. Monasteries dot the landscape, their golden roofs glistening under the sun's rays. The faithful pilgrims embark on arduous journeys along sacred trails like Kora, seeking enlightenment and solace amidst snow-capped peaks. Speaking of peaks, one cannot ignore the majestic Mount Kailash or Gang Rinpoche. Revered as a sacred site by multiple religions, this towering beauty stands tall in Ngari region's Gang-Tise Mountains. Its allure draws adventurers from around the world to conquer its formidable heights. As we traverse through Western Tibet's Transhimalaja region, we are reminded of Tibet's unique geopolitical status within China as an autonomous region. This mystical land is home to diverse ethnic groups who have preserved their traditions despite external influences. In our exploration of Tibetan artistry, we encounter stunning thangkas portraying Amitabha -the Buddha of Sukhavati- created centuries ago by unknown hands. These intricate paintings depict Bardo Mandala too -a representation symbolizing the period between death and reincarnation. Prayer flags fluttering against a backdrop dominated by Himalayan grandeur remind us that spirituality intertwines with nature here. They carry prayers for peace and compassion across vast distances while reminding us that Tibet shares borders with China to its east. The allure doesn't end there; Dharmachakra wheels spin tales about transmigratory existence on delicate paper scrolls crafted by skilled artisans' hands. History echoes through time as we glimpse at photographs from past expeditions attempting to conquer Mount Everest -Chomolungma- from both sides: North side near Rongbuk monastery and the South side in Nepal's Himalayas.