Fraud Blocker Skip to main content

History Of India Collection

"The Rich Tapestry of India's History Unveiled

Background imageHistory Of India Collection: Plan of the Battle of Assaye, illustration from Cassell

Plan of the Battle of Assaye, illustration from Cassell
876370 Plan of the Battle of Assaye, illustration from Cassells Illustrated History of India by James Grant, pub. 1879 (litho) by English School

Background imageHistory Of India Collection: Clive departing from India, illustration from Cassell

Clive departing from India, illustration from Cassell
876350 Clive departing from India, illustration from Cassells Illustrated History of India by James Grant, pub. 1879 (litho) by English School

Background imageHistory Of India Collection: The Sepoys at Buxar, illustration from Cassell

The Sepoys at Buxar, illustration from Cassell
876349 The Sepoys at Buxar, illustration from Cassells Illustrated History of India by James Grant, pub. 1879 (litho) by English School

Background imageHistory Of India Collection: Clive at Plassey, illustration from Cassells Illustrated History of India

Clive at Plassey, illustration from Cassells Illustrated History of India
876346 Clive at Plassey, illustration from Cassells Illustrated History of India by James Grant, pub. 1879 (litho) by English School

Background imageHistory Of India Collection: East India Companys ships leaving Woolwich, illustration from Cassell

East India Companys ships leaving Woolwich, illustration from Cassell
876342 East India Companys ships leaving Woolwich, illustration from Cassells Illustrated History of India by James Grant, pub

Background imageHistory Of India Collection: Tippoo Sahib at the lines of Travancore, illustration from Cassell

Tippoo Sahib at the lines of Travancore, illustration from Cassell
876363 Tippoo Sahib at the lines of Travancore, illustration from Cassells Illustrated History of India by James Grant, pub

Background imageHistory Of India Collection: Warren Hastings reviewing Pearses column, illustration from Cassell

Warren Hastings reviewing Pearses column, illustration from Cassell
876362 Warren Hastings reviewing Pearses column, illustration from Cassells Illustrated History of India by James Grant, pub

Background imageHistory Of India Collection: General Goddard entering Surat, illustration from Cassell

General Goddard entering Surat, illustration from Cassell
876357 General Goddard entering Surat, illustration from Cassells Illustrated History of India by James Grant, pub. 1879 (litho) by English School

Background imageHistory Of India Collection: Plan of the attack on Sholapore, illustration from Cassell

Plan of the attack on Sholapore, illustration from Cassell
876379 Plan of the attack on Sholapore, illustration from Cassells Illustrated History of India by James Grant, pub. 1879 (litho) by English School

Background imageHistory Of India Collection: Sir David Ochterlony and the Ghoorka messenger, illustration from Cassell

Sir David Ochterlony and the Ghoorka messenger, illustration from Cassell
876377 Sir David Ochterlony and the Ghoorka messenger, illustration from Cassells Illustrated History of India by James Grant, pub

Background imageHistory Of India Collection: Sir Eyre Coote, illustration from Cassells Illustrated History of India

Sir Eyre Coote, illustration from Cassells Illustrated History of India
876356 Sir Eyre Coote, illustration from Cassells Illustrated History of India by James Grant, pub. 1879 (litho) by English School

Background imageHistory Of India Collection: Arrest of Lord Pigot, illustration from Cassell

Arrest of Lord Pigot, illustration from Cassell
876353 Arrest of Lord Pigot, illustration from Cassells Illustrated History of India by James Grant, pub. 1879 (litho) by English School, (19th century); Private Collection; (add.info.: George Pigot)

Background imageHistory Of India Collection: Fletchers defence of the redoubt at Tanjore, illustration from Cassell

Fletchers defence of the redoubt at Tanjore, illustration from Cassell
876352 Fletchers defence of the redoubt at Tanjore, illustration from Cassells Illustrated History of India by James Grant, pub

Background imageHistory Of India Collection: Escape of Lieutenant Goreham, illustration from Cassell

Escape of Lieutenant Goreham, illustration from Cassell
876351 Escape of Lieutenant Goreham, illustration from Cassells Illustrated History of India by James Grant, pub. 1879 (litho) by English School

Background imageHistory Of India Collection: Sir David Ochterlony, illustration from Cassell

Sir David Ochterlony, illustration from Cassell
876371 Sir David Ochterlony, illustration from Cassells Illustrated History of India by James Grant, pub. 1879 (litho) by English School

Background imageHistory Of India Collection: Lord Teignmouth, illustration from Cassells Illustrated History of India

Lord Teignmouth, illustration from Cassells Illustrated History of India
876367 Lord Teignmouth, illustration from Cassells Illustrated History of India by James Grant, pub. 1879 (litho) by English School, (19th century); Private Collection; (add.info.: John Shore)

Background imageHistory Of India Collection: Charge of the Highlanders at Seringapatam, illustration from Cassell

Charge of the Highlanders at Seringapatam, illustration from Cassell
876366 Charge of the Highlanders at Seringapatam, illustration from Cassells Illustrated History of India by James Grant, pub

Background imageHistory Of India Collection: Rescue of Cheyte Sing: attack on the sepoys, illustration from Cassell

Rescue of Cheyte Sing: attack on the sepoys, illustration from Cassell
876361 Rescue of Cheyte Sing: attack on the sepoys, illustration from Cassells Illustrated History of India by James Grant, pub

Background imageHistory Of India Collection: Elephant equipped for battle, with armour, howdah, etc

Elephant equipped for battle, with armour, howdah, etc
876345 Elephant equipped for battle, with armour, howdah, etc. illustration from Cassells Illustrated History of India by James Grant, pub

Background imageHistory Of India Collection: Hyder Ali and the missionary, illustration from Cassell

Hyder Ali and the missionary, illustration from Cassell
876358 Hyder Ali and the missionary, illustration from Cassells Illustrated History of India by James Grant, pub. 1879 (litho) by English School

Background imageHistory Of India Collection: Plan of the defence of Seetabuldee Hill, illustration from Cassell

Plan of the defence of Seetabuldee Hill, illustration from Cassell
876378 Plan of the defence of Seetabuldee Hill, illustration from Cassells Illustrated History of India by James Grant, pub

Background imageHistory Of India Collection: Aire leading the attack at Bangalore, illustration from Cassell

Aire leading the attack at Bangalore, illustration from Cassell
876364 Aire leading the attack at Bangalore, illustration from Cassells Illustrated History of India by James Grant, pub. 1879 (litho) by English School

Background imageHistory Of India Collection: The Battle of Arass: the Grenadiers at bay, illustration from Cassell

The Battle of Arass: the Grenadiers at bay, illustration from Cassell
876354 The Battle of Arass: the Grenadiers at bay, illustration from Cassells Illustrated History of India by James Grant, pub

Background imageHistory Of India Collection: The French Commissioners coming to treat for the surrender of Pondicherry

The French Commissioners coming to treat for the surrender of Pondicherry
876348 The French Commissioners coming to treat for the surrender of Pondicherry, illustration from Cassells Illustrated History of India by James Grant, pub

Background imageHistory Of India Collection: Captain Yorke leading the forlorn hope at Masulipatam, Illustration from Cassell

Captain Yorke leading the forlorn hope at Masulipatam, Illustration from Cassell
876347 Captain Yorke leading the forlorn hope at Masulipatam, Illustration from Cassells Illustrated History of India by James Grant, pub

Background imageHistory Of India Collection: Lieutenant Flints Deed of Daring, illustration from Cassell

Lieutenant Flints Deed of Daring, illustration from Cassell
876359 Lieutenant Flints Deed of Daring, illustration from Cassells Illustrated History of India by James Grant, pub. 1879 (litho) by English School

Background imageHistory Of India Collection: Arrival of Major Lawrence at Coilady, illustration from Cassell

Arrival of Major Lawrence at Coilady, illustration from Cassell
876344 Arrival of Major Lawrence at Coilady, illustration from Cassells Illustrated History of India by James Grant, pub. 1879 (litho) by English School

Background imageHistory Of India Collection: Clive leading his men up to Conjeveram, illustration from Cassell

Clive leading his men up to Conjeveram, illustration from Cassell
876343 Clive leading his men up to Conjeveram, illustration from Cassells Illustrated History of India by James Grant, pub

Background imageHistory Of India Collection: Death of Rollo Gillespie, illustration from Cassell

Death of Rollo Gillespie, illustration from Cassell
876376 Death of Rollo Gillespie, illustration from Cassells Illustrated History of India by James Grant, pub. 1879 (litho) by English School

Background imageHistory Of India Collection: Lieutenant Graham planting the standard, illustration from Cassell

Lieutenant Graham planting the standard, illustration from Cassell
876369 Lieutenant Graham planting the standard, illustration from Cassells Illustrated History of India by James Grant, pub

Background imageHistory Of India Collection: Sea-fight off Trincomalee, illustration from Cassell

Sea-fight off Trincomalee, illustration from Cassell
876360 Sea-fight off Trincomalee, illustration from Cassells Illustrated History of India by James Grant, pub. 1879 (litho) by English School


All Professionally Made to Order for Quick Shipping

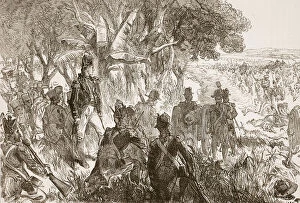
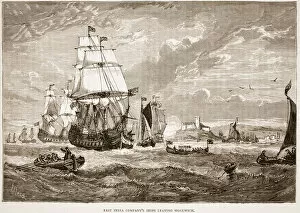
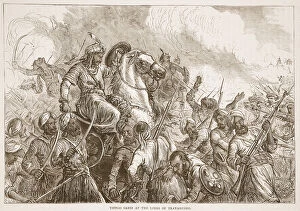
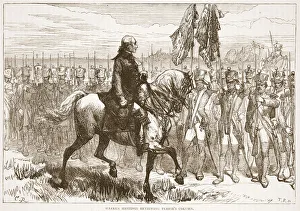
"The Rich Tapestry of India's History Unveiled: A Glimpse into the Pages of Cassell's Illustrated History" Step back in time and immerse yourself in the captivating history of India, as depicted through a series of stunning illustrations from Cassell's Illustrated History. From pivotal battles to colonial rule, these visual narratives offer a glimpse into the nation's past. One such illustration transports us to the Battle of Assaye, where we witness the strategic plan that shaped its outcome. The bravery and tenacity displayed by both sides are palpable even on paper. Similarly, Clive departing from India signifies an end to an era while leaving behind a legacy that would forever impact Indian history. The Sepoys at Buxar stand united against foreign forces, showcasing their unwavering loyalty towards their homeland. Meanwhile, Clive at Plassey captures a defining moment when British influence began to take root in India through diplomacy and military prowess. As East India Company ships depart Woolwich, we witness the beginning of an era marked by trade dominance and territorial expansion. Colonel Maitland at Bhurtpore showcases another chapter wherein British forces faced formidable resistance but ultimately emerged victorious. Intriguingly, Tippoo Sahib at Travancore reveals tensions between native rulers and imperial powers during this period. Warren Hastings reviewing Pearse's column highlights administrative reforms undertaken by British officials striving for efficient governance. General Goddard entering Surat symbolizes yet another conquest achieved under British command while Duel between Warren Hastings and Francis reflects internal conflicts within colonial administration itself. Delving deeper into military strategies, Plan of attack on Sholapore illustrates meticulous planning before engaging in battle—a testament to tactical brilliance employed during those times. Lastly, Sir David Ochterlony conversing with a Ghoorka messenger exemplifies cultural exchanges amidst political negotiations. These illustrations serve as windows into moments etched indelibly upon India's history.