Home > Africa > South Africa > Related Images
The Battle of Spion Kop, the Dash up the Mountain under Heavy Fire (litho)
")
![]()
Wall Art and Photo Gifts from Fine Art Finder
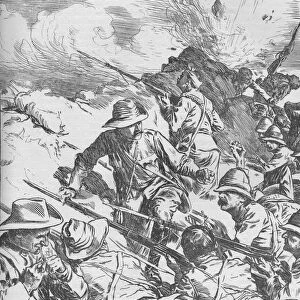
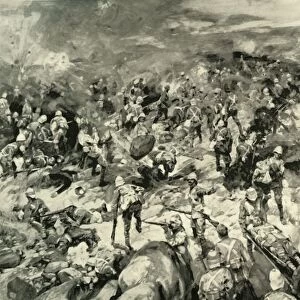
The Battle of Spion Kop, the Dash up the Mountain under Heavy Fire (litho)
1048827 The Battle of Spion Kop, the Dash up the Mountain under Heavy Fire (litho) by Fripp, Charles Edwin (1854-1906); Private Collection; (add.info.: The Battle of Spion Kop, the Dash up the Mountain under Heavy Fire. Illustration for The Graphic, 3 March 1900.); Look and Learn / Illustrated Papers Collection; English, out of copyright
Media ID 22221808
© Look and Learn / Illustrated Papers Collection / Bridgeman Images
Boer War Dash Heavy Fire Battle Of Spion Kop
FEATURES IN THESE COLLECTIONS
> Africa
> South Africa
> Related Images
> Arts
> Artists
> Related Images
> Fine Art Finder
> Artists
> Charles Edwin Fripp
> Fine Art Finder
> Artists
> John (after) Charlton
> Fine Art Finder
> Temp Classification
EDITORS COMMENTS
This lithograph, titled "The Battle of Spion Kop, the Dash up the Mountain under Heavy Fire" transports us back to a pivotal moment in history. Created by Charles Edwin Fripp, this print captures the intensity and bravery displayed during the Boer War. In this scene, we witness soldiers fearlessly charging up a treacherous mountain amidst relentless enemy fire. The artist's meticulous attention to detail brings every element of chaos and danger to life. Smoke billows from rifles as bullets whiz through the air, creating an atmosphere charged with tension and uncertainty. "The Battle of Spion Kop" serves as a powerful reminder of the sacrifices made by those who fought for their countries. It symbolizes not only the physical challenges faced on that fateful day but also represents the resilience and determination exhibited by soldiers in times of war. As viewers gaze upon this lithograph, they are transported into a world where courage is tested against insurmountable odds. The composition draws our eyes towards these brave men dashing uphill, highlighting their unwavering resolve despite facing heavy fire. This remarkable piece is part of Look and Learn / Illustrated Papers Collection held in a private collection today. Its historical significance cannot be overstated; it immortalizes an event that shaped nations while paying tribute to those who valiantly fought for their cause on that perilous battlefield.
MADE IN THE USA
Safe Shipping with 30 Day Money Back Guarantee
FREE PERSONALISATION*
We are proud to offer a range of customisation features including Personalised Captions, Color Filters and Picture Zoom Tools
SECURE PAYMENTS
We happily accept a wide range of payment options so you can pay for the things you need in the way that is most convenient for you
* Options may vary by product and licensing agreement. Zoomed Pictures can be adjusted in the Cart.