Home > Animals > Birds > Gruiformes > Rallidae > Water Rail
Dock Railway

![]()
Wall Art and Photo Gifts from Australian Views
Dock Railway
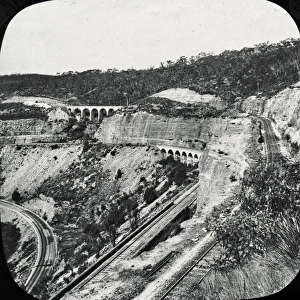
circa 1915: A busy harbour scene on the Hobsons Bay Railway Pier at Sandridge, Melbourne. (Photo by Hulton Archive/Getty Images)
Unveiling the Splendour of Australia through Exquisite Artwork
Hulton Archive
Dock Railway
Media ID 13237739
© This content is subject to copyright
Format Landscape Sailing Ship Ship Train Vessel White Black And Rail Transport Steam Train Water Transport
FEATURES IN THESE COLLECTIONS
> Animals
> Birds
> Gruiformes
> Rallidae
> Black Rail
> Animals
> Birds
> Gruiformes
> Rallidae
> Water Rail
> Australian Views
> Australia's Rich History
> Oceania
> Australia
> Melbourne
EDITORS COMMENTS
This print takes us back in time to the bustling harbour scene of Hobsons Bay Railway Pier at Sandridge, Melbourne, circa 1915. The image captures a moment filled with energy and movement as various modes of transportation intersect on this historical landmark. In the foreground, we see a majestic sailing ship gracefully gliding through the calm waters, its tall masts reaching towards the sky. Behind it stands an impressive steam train, billowing clouds of smoke into the air as it prepares for departure. This juxtaposition between water transport and rail transport showcases the importance of both industries during this era. The dock is alive with activity; workers scurry about their duties while passengers eagerly await their turn to board either vessel. The atmosphere is charged with anticipation and excitement as people embark on new adventures or reunite with loved ones arriving from distant shores. The composition's monochromatic palette adds a timeless quality to this snapshot from history. It allows us to focus on the intricate details: every line etched onto the ships' hulls, each brick meticulously laid along the railway pier. As we gaze upon this remarkable piece captured by Hulton Archive/Getty Images, we are transported back in time to witness firsthand an era where maritime trade thrived alongside advancements in rail transportation—a testament to Australia's rich heritage and its deep connection with both land and sea.
MADE IN THE USA
Safe Shipping with 30 Day Money Back Guarantee
FREE PERSONALISATION*
We are proud to offer a range of customisation features including Personalised Captions, Color Filters and Picture Zoom Tools
SECURE PAYMENTS
We happily accept a wide range of payment options so you can pay for the things you need in the way that is most convenient for you
* Options may vary by product and licensing agreement. Zoomed Pictures can be adjusted in the Cart.