Framed Print : Boer War : Spion Kop


![]()
Framed Photos from Mary Evans Picture Library
Boer War : Spion Kop
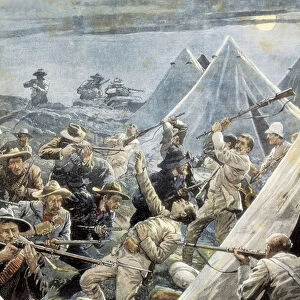
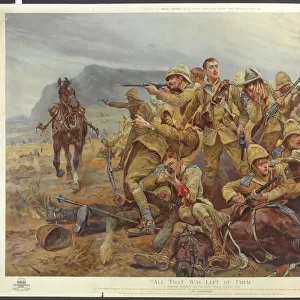
BATTLE OF SPION KOP A British night attack takes this strategic obstacle to the advance on Ladysmith; but they are unable to hold it and have to abandon it
Mary Evans Picture Library makes available wonderful images created for people to enjoy over the centuries
Media ID 615332
© Mary Evans Picture Library 2015 - https://copyrighthub.org/s0/hub1/creation/maryevans/MaryEvansPictureID/10097488
Abandon Advance Attack Boer Hold Ladysmith Obstacle Spion Strategic Takes Unable January
22"x18" Modern Frame
Introducing the captivating Boer War: Spion Kop Framed Print from Media Storehouse, brought to you in partnership with Mary Evans Prints Online. This evocative image transports you back in time to the pivotal moment of the Battle of Spion Kop. Witness the intensity of the night attack as British forces attempt to seize this strategic obstacle during their advance on Ladysmith. The determination and courage of the soldiers are palpable in this powerful and historic image. The framed print adds an exquisite touch to any room, serving as a testament to the indomitable spirit of those who fought in this significant conflict. Bring a piece of history into your home and relive the past with our authentic and beautifully presented Boer War: Spion Kop Framed Print.
20x16 Print in an MDF Wooden Frame with 180 gsm Satin Finish Paper. Glazed using shatter proof thin plexiglass. Frame thickness is 1 inch and depth 0.75 inch. Fluted cardboard backing held with clips. Supplied ready to hang with sawtooth hanger and rubber bumpers. Spot clean with a damp cloth. Packaged foam wrapped in a card.
Contemporary Framed and Mounted Prints - Professionally Made and Ready to Hang
Estimated Image Size (if not cropped) is 45.7cm x 50.8cm (18" x 20")
Estimated Product Size is 45.7cm x 55.9cm (18" x 22")
These are individually made so all sizes are approximate
Artwork printed orientated as per the preview above, with portrait (vertical) orientation to match the source image.
EDITORS COMMENTS
This evocative photograph captures the aftermath of the Battle of Spion Kop, a pivotal moment in the Second Boer War in South Africa. In this image, weary British soldiers are seen making their way down the slopes of Spion Kop, a strategic hill overlooking the town of Ladysmith, following an unsuccessful night attack. The hill had been taken by the British on January 23, 1900, but they were unable to hold the position against the determined resistance of the Boer forces. The Battle of Spion Kop was one of the most significant engagements of the Second Boer War, which lasted from 1899 to 1902. The hill, which stands at over 2,000 feet high, had been a major obstacle to the British advance on Ladysmith, a key Boer stronghold. The British had launched a night attack on the hill, hoping to surprise the Boers and secure a decisive victory. However, the attack was poorly coordinated, and the British were unable to maintain their position once they had taken the hill. Despite their failure to hold Spion Kop, the British continued their advance on Ladysmith, eventually taking the town in February 1900. The Battle of Spion Kop marked a turning point in the war, as the British were able to demonstrate their ability to mount successful attacks against the Boer defenses. The battle also highlighted the tenacity and determination of the Boer forces, who were able to hold out against the British despite being outnumbered and outgunned. This photograph is a poignant reminder of the sacrifices made by soldiers on both sides during the Second Boer War. It also serves as a testament to the enduring historical significance of this conflict, which shaped the political and social landscape of South Africa for generations to come.
MADE IN THE USA
Safe Shipping with 30 Day Money Back Guarantee
FREE PERSONALISATION*
We are proud to offer a range of customisation features including Personalised Captions, Color Filters and Picture Zoom Tools
SECURE PAYMENTS
We happily accept a wide range of payment options so you can pay for the things you need in the way that is most convenient for you
* Options may vary by product and licensing agreement. Zoomed Pictures can be adjusted in the Cart.